83. Promise
The Promise Storage Area Network (SAN) is capable of sending SNMP traps to remote destinations. Unfortunately Syslog is not supported on these units.
2654 Fan 4 Enc 1 Info Apr 27, 2017 19:08:48 PSU fan or blower speed is decreasedThere is a single management interface no matter how many shelves are installed, so configuration only needs to be performed once from the Promise web interface or the command line.
More information about configuring Promise arrays is available in the E-Class product manual. Also, additional details on CNMP configuration and links to MIB files are available in the following KB article.
-
Configure NXLog for receiving SNMP traps (see the example below). Remember to place the MIB file in the directory specified by the MIBDir directive. Then restart NXLog.
-
Make sure the NXLog agent is accessible from the unit.
-
Configure Promise by using the web interface or the command line. See the following sections.
This example shows SNMP trap messages from Promise, as received and processed by NXLog.
  1
2
3
4
5
6
7
8
9
10
11
12
13
14
15
16
17
18
19
20
21
22
23
24
25
26

  <Extension _syslog>
    Module      xm_syslog
</Extension>

<Extension _json>
    Module      xm_json
</Extension>

<Extension snmp>
    Module      xm_snmp
    MIBDir      /usr/share/mibs/iana
</Extension>

<Input in_snmp_udp>
    Module      im_udp
    Host        0.0.0.0
    Port        162
    InputType   snmp
    Exec        parse_syslog();
</Input>

<Output file_snmp>
    Module      om_file
    File        "/var/log/snmp.log"
    Exec        to_json();
</Output>
{
  "SNMP.CommunityString": "public",
  "SNMP.RequestID": 1295816642,
  "EventTime": "2017-04-27 20:44:37",
  "SeverityValue": 2,
  "Severity": "INFO",
  "OID.1.3.6.1.2.1.1.3.0": 67,
  "OID.1.3.6.1.6.3.1.1.4.1.0": "1.3.6.1.4.1.7933.1.20.0.11.0.1",
  "OID.1.3.6.1.4.1.7933.1.20.0.10.1": 2654,
  "OID.1.3.6.1.4.1.7933.1.20.0.10.2": 327683,
  "OID.1.3.6.1.4.1.7933.1.20.0.10.3": 327683,
  "OID.1.3.6.1.4.1.7933.1.20.0.10.4": 2,
  "OID.1.3.6.1.4.1.7933.1.20.0.10.5": "Fan 4 Enc 1",
  "OID.1.3.6.1.4.1.7933.1.20.0.10.6": "Apr 27, 2017 19:08:48",
  "OID.1.3.6.1.4.1.7933.1.20.0.10.7": "PSU fan or blower speed is decreased",
  "MessageSourceAddress": "192.168.10.21",
  "EventReceivedTime": "2017-04-27 20:44:37",
  "SourceModuleName": "in_snmp_udp",
  "SourceModuleType": "im_udp",
  "SyslogFacilityValue": 1,
  "SyslogFacility": "USER",
  "SyslogSeverityValue": 5,
  "SyslogSeverity": "NOTICE",
  "Hostname": "INFO",
  "Message": "OID.1.3.6.1.2.1.1.3.0=\"67\" OID.1.3.6.1.6.3.1.1.4.1.0=\"1.3.6.1.4.1.7933.1.20.0.11.0.1\" OID.1.3.6.1.4.1.7933.1.20.0.10.1=\"2654\" OID.1.3.6.1.4.1.7933.1.20.0.10.2=\"327683\" OID.1.3.6.1.4.1.7933.1.20.0.10.3=\"327683\" OID.1.3.6.1.4.1.7933.1.20.0.10.4=\"2\" OID.1.3.6.1.4.1.7933.1.20.0.10.5=\"Fan 4 Enc 1\" OID.1.3.6.1.4.1.7933.1.20.0.10.6=\"Apr 27, 2017 19:08:48\" OID.1.3.6.1.4.1.7933.1.20.0.10.7=\"PSU fan or blower speed is decreased\""
}|
Note
|
The steps below have been tested on the VTrak E600 series and should work on other models as well. |
83.1. Configuring via Web Interface
Follow these steps to enable sending SNMP traps through the web interface.
-
Log in to the web interface.
-
Go to .
-
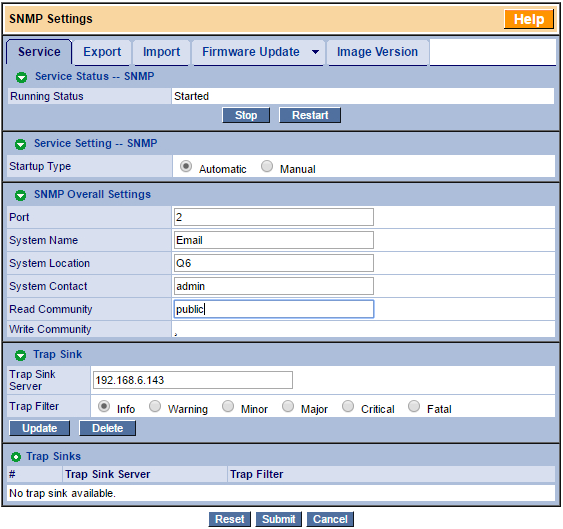
Under the Service tab, click on SNMP.
-
Under Trap Sink, specify the Trap Sink Server IP address and select the appropriate Trap Filter to choose the logging level. Then click Update.
-
Make sure Running Status is Started and Startup Type is set to Automatic.
-
Click Submit and confirm SNMP restart.
83.2. Configuring via Command Line
Follow these steps to enable sending SNMP traps through the command line interface.
-
Connect to Promise via SSH.
-
Type
menu. -
Go to .
-
Select .
-
Specify the remote IP address under Trap Sink Server and the logging level under Trap Filter.
-
Select Save SNMP Trap Sink.
-
Select Return to Previous Menu and then Restart.
-
Make sure Startup Type is set to Automatic.