41. APC Automatic Transfer Switch
The APC Automatic Transfer Switch (ATS) is capable of sending its logs to a remote Syslog destination via UDP.
Date        Time      Event
------------------------------------------------------------------------
03/26/2017  16:20:55  Automatic Transfer Switch: Communication
                      established.
03/26/2017  16:20:45  System: Warmstart.
03/26/2017  16:19:13  System: Detected an unauthorized user attempting
                      to access the SNMP interface from 192.168.15.11.
The ATS is an independent device, so if there more than one installed in a particular environment the configuration below must be applied to each device individually. For more details about configuring APC ATS logging, go to the APC Support Site and select the product name or part number.
|
Note
|
The steps below have been tested on AP7700 series devices and should work for other ATS models also. |
-
Configure NXLog for receiving log entries via UDP (see the example below). Then restart NXLog.
-
Make sure the NXLog agent is accessible from the device.
-
Configure Syslog logging on the ATS using either the web interface or the command line. See the following sections.
The following examples shows the ATS logs as received and processed by NXLog.
  1
2
3
4
5
6
7
8
9
10
11
12
13
14
15
16
17
18
19
20

  <Extension _syslog>
    Module  xm_syslog
</Extension>

<Extension _json>
    Module  xm_json
</Extension>

<Input in_syslog_udp>
    Module  im_udp
    Host    0.0.0.0
    Port    514
    Exec    parse_syslog();
</Input>

<Output file>
    Module  om_file
    File    "/var/log/apc.log"
    Exec    to_json();
</Output>
Logs like the example at the beginning of the chapter will produce output as follows.
{
  "MessageSourceAddress": "192.168.15.22",
  "EventReceivedTime": "2017-03-26 17:03:27",
  "SourceModuleName": "in_syslog_udp",
  "SourceModuleType": "im_udp",
  "SyslogFacilityValue": 23,
  "SyslogFacility": "LOCAL7",
  "SyslogSeverityValue": 7,
  "SyslogSeverity": "DEBUG",
  "SeverityValue": 1,
  "Severity": "DEBUG",
  "Hostname": "192.168.15.22",
  "EventTime": "2017-03-26 16:04:18",
  "SourceName": "System",
  "Message": "Detected an unauthorized user attempting to access the SNMP interface from 192.168.15.11. 0x0004"
}
{
  "MessageSourceAddress": "192.168.15.22",
  "EventReceivedTime": "2017-03-26 17:20:04",
  "SourceModuleName": "in_syslog_udp",
  "SourceModuleType": "im_udp",
  "SyslogFacilityValue": 23,
  "SyslogFacility": "LOCAL7",
  "SyslogSeverityValue": 7,
  "SyslogSeverity": "DEBUG",
  "SeverityValue": 1,
  "Severity": "DEBUG",
  "Hostname": "192.168.15.22",
  "EventTime": "2017-03-26 16:20:54",
  "SourceName": "System",
  "Message": "Warmstart. 0x0002"
}
{
  "MessageSourceAddress": "192.168.15.22",
  "EventReceivedTime": "2017-03-26 17:20:04",
  "SourceModuleName": "in_syslog_udp",
  "SourceModuleType": "im_udp",
  "SyslogFacilityValue": 23,
  "SyslogFacility": "LOCAL7",
  "SyslogSeverityValue": 7,
  "SyslogSeverity": "DEBUG",
  "SeverityValue": 1,
  "Severity": "DEBUG",
  "Hostname": "192.168.15.22",
  "EventTime": "2017-03-26 16:20:55",
  "Message": "Automatic Transfer Switch: Communication established. 0x0C05"
}
41.1. Configuring via the Web Interface
-
Log in to the web panel.
-
Go to .
-
Enable Syslog.
-
Select the Facility.
-
Add up to four Syslog servers and a port for each.
-
Map the Local Severity to the Syslog Severity as required.
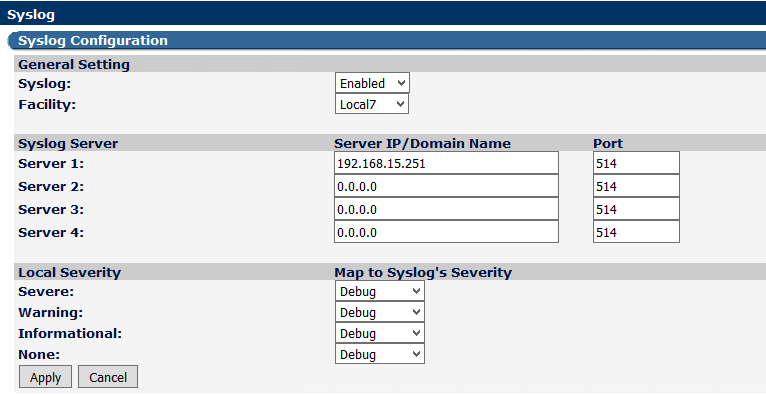
-
Click Apply.
41.2. Configuring via the Command Line
-
Log in to the ATS via Telnet.
-
Type 2 and then 9 to go to the Syslog settings.
-
Type 1 to configure the Syslog settings.
-
Type 1 to enable Syslog.
-
Type 2 to configure the Syslog facility.
-
Type 3 to save the changes.
-
Press ESC to go one level up.
-
Select one of the four Syslog server slots.
-
Type 1 to set the Syslog server IP address.
-
Type 2 to change set the UDP port number.
-
Type 3 to apply the changes.
-
Press ESC to go one level up.
-
Type 6 to map the local severity to the Syslog severity.
-
Use options from 1 to 4 to choose the mapping.
-
Type 5 to accept the changes.
The following shows the Syslog settings screen, which is shown after completing step 2 above.
------- Syslog ---------------------------------------------------------

    Syslog Settings               Severity Mapping
    --------------------------------------------------------------------
    Syslog  : Enabled             Severe : DEBUG          Info: DEBUG
    Facility: LOCAL7              Warning: DEBUG          None: DEBUG

    #  Syslog Server Port   IP
    --------------------------------------------------------------------
    1  514                192.168.15.251
    2  514                0.0.0.0
    3  514                0.0.0.0
    4  514                0.0.0.0

     1- Settings
     2- Server 1
     3- Server 2
     4- Server 3
     5- Server 4
     6- Severity Mapping

     <ESC>- Back, <ENTER>- Refresh, <CTRL-L>- Event Log
> 1