60. F5 BIG-IP
F5 BIG-IP appliances are capable of sending their logs to a remote Syslog destination via TCP or UDP. When sending logs over the network, it is recommended to use TCP as the more reliable protocol. With UDP there is a potential to lose entries, especially when there is a high volume of messages.
There are multiple sub-systems that write logs to different files. Below is an example of Local Traffic Management (LTM) logs reporting pool members being up or down.
Mar 14 16:50:12 l-lb1 notice mcpd[7660]: 01070639:5: Pool /Common/q-qa-pool member /Common/q-qa1:25 session status forced disabled.
Mar 14 16:51:33 l-lb1 notice mcpd[7660]: 01070639:5: Pool /Common/q-qa-pool member /Common/q-qa1:25 session status enabled.
The following audit logs are written to a different local file.
Mar 14 16:43:41 l-lb1 notice httpd[3064]: 01070417:5: AUDIT - user john - RAW: httpd(mod_auth_pam): user=john(john) partition=[All] level=Administrator tty=/usr/bin/tmsh host=192.168.9.78 attempts=1 start="Tue Mar 14 16:43:41 2017".
Mar 14 17:10:33 l-lb1 notice httpd[1181]: 01070417:5: AUDIT - user john - RAW: httpd(mod_auth_pam): user=john(john) partition=[All] level=Administrator tty=/usr/bin/tmsh host=192.168.9.78 attempts=1 start="Tue Mar 14 16:43:41 2017" end="Tue Mar 14 17:10:33 2017".
For more details on BIG-IP log files and how to view them, please refer to the K16197 knowledge base article. Additional information on configuring logging options on BIG-IP devices can be found in the F5 Knowledge Center. Select the appropriate software version and look for the "Log Files" section in the TMOS Operations Guide.
|
Note
|
The steps below have been tested with BIG-IP v11 but should also work for other versions. |
60.1. Collecting BIG-IP Logs via TCP
The BIG-IP web interface does not provide a way to configure an external TCP Syslog destination, so this must be done via the command line.
-
Configure NXLog to receive log entries via TCP and process them as Syslog (see the examples below). Then restart NXLog.
-
Make sure the NXLog agent is accessible from all BIG-IP devices being configured. A new route or default gateway may need to be configured depending on the current setup.
-
Connect via SSH to the BIG-IP device. In case of a High Availability (HA) group, make sure you are logged into the active unit. You should see (Active) in the command prompt.
-
Review the existing Syslog configuration on BIG-IP and remove it.
# tmsh list sys syslog include # tmsh modify sys syslog include none -
Configure a remote Syslog destination on BIG-IP. Replace
IP_SYSLOGandPORTwith the IP address and port that the NXLog agent is listening on. ReplaceLEVELwith the required logging level.# tmsh modify sys syslog include "destination remote_server \ {tcp(\"IP_SYSLOG\" port (PORT));};filter f_alllogs \ {level (LEVEL...emerg);};log {source(local);filter(f_alllogs);\ destination(remote_server);};"NoteThis command forwards all appliance logs to the remote destination, so nothing will be logged locally as soon as it is executed. Example 249. Redirecting Informational Logs via TCPThis command redirects logs at the informational level (from
infotoemerg) to an NXLog agent at 192.168.6.43, via TCP port 1514.# tmsh modify /sys syslog include "destination remote_server \ {tcp(\"192.168.6.143\" port (1514));};filter f_alllogs \ {level (info...emerg);};log {source(local);filter(f_alllogs);\ destination(remote_server);};" -
In case of a High Availability (HA) group, synchronize the configuration changes to the other units.
# tmsh run cm config-sync to-group GROUP_NAMENoteOnce the configuration has been synchronized to all members of the group, each member will be sending logs, inserting its own hostname and IP address. In the event of failover, logging will continue from both units regardless of which one is currently active.
This configuration uses the im_tcp module to collect the BIG-IP logs. A JSON output sample shows the resulting logs as received and processed by NXLog.
  1
2
3
4
5
6
7
8
9
10
11
12
13
14
15
16
17
18
19
20

  <Extension _syslog>
    Module  xm_syslog
</Extension>

<Extension _json>
    Module  xm_json
</Extension>

<Input in>
    Module  im_tcp
    Host    0.0.0.0
    Port    1514
    Exec    parse_syslog();
</Input>

<Output out>
    Module  om_file
    File    "/var/log/f5.log"
    Exec    to_json();
</Output>
{
  "MessageSourceAddress": "192.168.6.161",
  "EventReceivedTime": "2017-03-14 17:03:16",
  "SourceModuleName": "in",
  "SourceModuleType": "im_tcp",
  "SyslogFacilityValue": 16,
  "SyslogFacility": "LOCAL0",
  "SyslogSeverityValue": 5,
  "SyslogSeverity": "NOTICE",
  "SeverityValue": 2,
  "Severity": "INFO",
  "Hostname": "l-lb2",
  "EventTime": "2017-03-14 17:03:53",
  "SourceName": "mcpd",
  "ProcessID": "7233",
  "Message": "notice httpd[5150]: 01070639:5: Pool /Common/q-qa-pool member /Common/q-qa1:25 session status enabled."
}
{
  "MessageSourceAddress": "192.168.6.91",
  "EventReceivedTime": "2017-03-14 17:10:18",
  "SourceModuleName": "in",
  "SourceModuleType": "im_tcp",
  "SyslogFacilityValue": 16,
  "SyslogFacility": "LOCAL0",
  "SyslogSeverityValue": 5,
  "SyslogSeverity": "NOTICE",
  "SeverityValue": 2,
  "Severity": "INFO",
  "Hostname": "l-lb1",
  "EventTime": "2017-03-14 17:10:33",
  "SourceName": "httpd",
  "ProcessID": "1181",
  "Message": "notice httpd[5150]: 01070417:5: AUDIT - user john - RAW: httpd(mod_auth_pam): user=john(john) partition=[All] level=Administrator tty=/usr/bin/tmsh host=192.168.9.78 attempts=1 start=\"Tue Mar 14 16:43:41 2017\" end=\"Tue Mar 14 17:10:33 2017\"."
}
NXLog can also be configured to extract additional fields from the messages, including those that contain key-value pairs.
This configuration uses the xm_syslog parse_syslog() procedure to parse Syslog messages and the xm_kvp module to extract additional fields.
  1
2
3
4
5
6
7
8
9
10
11
12
13
14
15
16
17
18
19
20
21
22
23
24
25
26
27
28
29
30
31
32
33
34
35
36
37
38
39
40
41
42
43
44
45
46
47

  <Extension _syslog>
    Module          xm_syslog
</Extension>

<Extension _json>
    Module          xm_json
</Extension>

<Extension kvp>
    Module          xm_kvp
    KVPDelimiter    " "
    KVDelimiter     =
    EscapeChar      \\
</Extension>

<Input in>
    Module          im_tcp
    Host            0.0.0.0
    Port            1514
    <Exec>
        parse_syslog();
        if  $Message =~ /^([a-z]*) ([a-zA-Z]*)(.*)$/
        {
            $F5MsgLevel = $1;
            $F5Proc = $2;
            $F5Message = $3;
            if $F5Message =~ /^\[[0-9]*\]: ([0-9]*):([0-9]+): (.*)$/
            {
                $F5MsgID = $1;
                $F5MsgSev = $2;
                $F5Msg = $3;
                if $F5Msg =~ /RAW: ([a-z]*)\(([a-z_]*)\): ([a-zA-Z]+=.+)/
                {
                    $F5Process = $1;
                    $F5Module = $2;
                    kvp->parse_kvp($3);
                }
            }
        }
    </Exec>
</Input>

<Output out>
    Module          om_file
    File            "/var/log/f5.log"
    Exec            to_json();
</Output>
{
  "MessageSourceAddress": "192.168.6.91",
  "EventReceivedTime": "2017-04-16 00:06:43",
  "SourceModuleName": "in",
  "SourceModuleType": "im_tcp",
  "SyslogFacilityValue": 10,
  "SyslogFacility": "AUTHPRIV",
  "SyslogSeverityValue": 5,
  "SyslogSeverity": "NOTICE",
  "SeverityValue": 2,
  "Severity": "INFO",
  "Hostname": "l-lb1",
  "EventTime": "2017-04-16 00:07:59",
  "Message": "notice httpd[5320]: 01070417:5: AUDIT - user john - RAW: httpd(mod_auth_pam): user=john(john) partition=[All] level=Administrator tty=/usr/bin/tmsh host=192.168.9.78 attempts=1 start=\"Sun Apr 16 00:07:59 2017\".",
  "F5MsgLevel": "notice",
  "F5Proc": "httpd",
  "F5Message": "[5320]: 01070417:5: AUDIT - user john - RAW: httpd(mod_auth_pam): user=john(john) partition=[All] level=Administrator tty=/usr/bin/tmsh host=192.168.9.78 attempts=1 start=\"Sun Apr 16 00:07:59 2017\".",
  "F5MsgID": "01070417",
  "F5MsgSev": "5",
  "F5Msg": "AUDIT - user john - RAW: httpd(mod_auth_pam): user=john(john) partition=[All] level=Administrator tty=/usr/bin/tmsh host=192.168.9.78 attempts=1 start=\"Sun Apr 16 00:07:59 2017\".",
  "F5Process": "httpd",
  "F5Module": "mod_auth_pam",
  "user": "john(john)",
  "partition": "[All]",
  "level": "Administrator",
  "tty": "/usr/bin/tmsh",
  "host": "192.168.9.78",
  "attempts": "1",
  "start": "Sun Apr 16 00:19:55 2017"
}
60.2. Collecting BIG-IP Logs via UDP
When reliable delivery is not a concern, or in case there is a requirement to have local copies of log entries on each appliance, BIG-IP logs can be sent to a remote Syslog destination via UDP.
-
Configure NXLog to receive log entries via UDP and process them as Syslog (see the example below). Then restart the agent.
-
Make sure the NXLog agent is accessible from all BIG-IP devices being configured. A new route or default gateway may need to be configured, depending on the current setup.
-
Proceed with the Syslog configuration on BIG-IP, using either the command line or the web interface. See the following sections.
This configuration uses the im_udp module to collect the BIG-IP logs.
  1
2
3
4
5
6
7
8
9
10

  <Extension _syslog>
    Module  xm_syslog
</Extension>

<Input in_syslog_udp>
    Module  im_udp
    Host    0.0.0.0
    Port    514
    Exec    parse_syslog();
</Input>
60.2.1. Configuring via the Command Line
-
Connect via SSH to the BIG-IP device. In case of a High Availability (HA) group, make sure you are logged into the active unit. You should see (Active) in command prompt.
-
Configure a remote Syslog destination on BIG-IP. Replace
IP_SYSLOGandPORTwith the IP address and port that the NXLog agent is listening on.# tmsh modify sys syslog remote-servers add { nxlog { \ host IP_SYSLOG remote-port PORT } }Example 253. Redirecting Informational Logs via UDPThis command redirects Informational Logs to an NXLog agent at 192.168.6.143, via UDP port 514.
# tmsh modify sys syslog remote-servers add { nxlog { \ host 192.168.6.143 remote-port 514 } } -
In case of a High Availability (HA) group, synchronize configuration changes to the other units:
# tmsh run cm config-sync to-group GROUP_NAMENoteOnce the configuration has been synchronized to all members of the group, each member will be sending logs, inserting its own hostname and IP address. In the event of failover, logging will continue from both units regardless of which one is currently active.
60.2.2. Configuring via the Web Interface
-
Log in to the BIG-IP web interface. In case of a High Availability (HA) group, make sure you are logged into the active unit. You should see ONLINE (Active) in the top left corner.
-
Go to .
-
Type in the Remote IP and Remote Port, then click Add and Update.
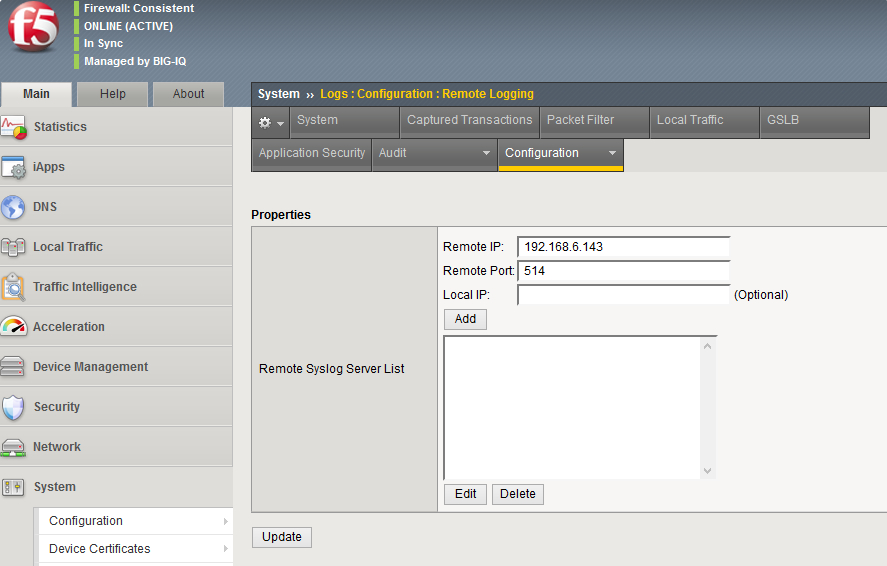
-
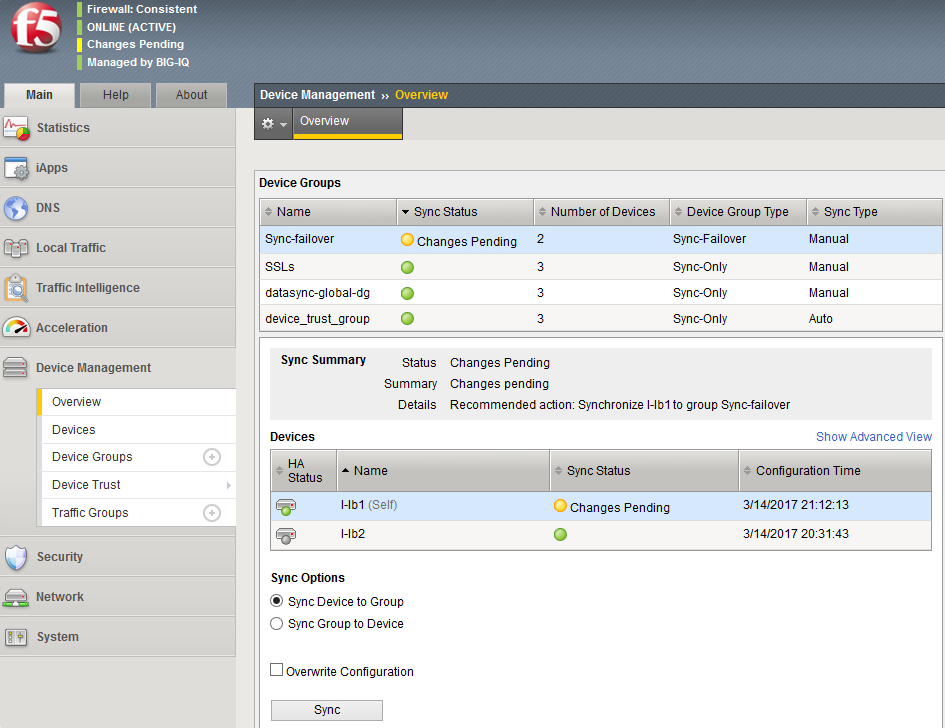
In case of a High Availability (HA) group, synchronize the configuration changes to the other units:
-
Click on the yellow Changes Pending in the top left corner.
-
Select Active unit which should be marked as (Self).
-
Make sure Sync Device to Group option is chosen and click Sync.
-
|
Note
|
Once the configuration has been synchronized to all members of the group, each member will be sending logs, inserting its own hostname and IP address. In the event of failover, logging will continue from both units regardless of which one is currently active. |
60.3. Using SNMP Traps
BIG-IP devices are also capable of sending SNMP traps. The device contains predefined default SNMP traps which can be enabled during SNMP configuration. There is also an option to create user-defined traps. More information about SNMP support on BIG-IP devices can be found in the F5 Knowledge Center under the "Alerts" section in the TMOS Operations Guide.
BIG-IP systems also come with Management Information Base (MIB) files stored on the device itself. Additional information on that is available in K13322.
-
Configure NXLog with the xm_snmp module. See the example below.
-
Make sure the NXLog agent is accessible from all BIG-IP devices being configured. A new route or default gateway may need to be configured, depending on the current setup.
-
Proceed with the SNMP configuration on BIG-IP, using either the command line or the web interface. See the following sections.
This example NXLog configuration uses the im_udp and xm_snmp modules to receive SNMP traps. The corresponding JSON-formatted output is shown below.
  1
2
3
4
5
6
7
8
9
10
11
12
13
14
15
16
17
18
19
20
21
22
23
24
25
26
27
28

  <Extension _json>
    Module      xm_json
</Extension>

<Extension snmp>
    Module      xm_snmp
    MIBDir      /usr/share/mibs/bigip
    # The following <User> section is required for SNMPv3
    #<User snmp_user>
    #    AuthProto sha1
    #    AuthPasswd q1w2e3r4
    #    EncryptPasswd q1w2e3r4
    #    EncryptProto aes
    #</User>
</Extension>

<Input in>
    Module      im_udp
    Host        0.0.0.0
    Port        162
    InputType   snmp
</Input>

<Output out>
    Module      om_file
    File        "/var/log/f5.log"
    Exec        to_json();
</Output>
{
  "SNMP.CommunityString": "nxlog",
  "SNMP.RequestID": 449377444,
  "EventTime": "2017-03-18 16:37:41",
  "SeverityValue": 2,
  "Severity": "INFO",
  "OID.1.3.6.1.2.1.1.3.0": 1277437018,
  "OID.1.3.6.1.6.3.1.1.4.1.0": "1.3.6.1.4.1.3375.2.4.0.3",
  "OID.1.3.6.1.6.3.1.1.4.3.0": "1.3.6.1.4.1.3375.2.4",
  "MessageSourceAddress": "192.168.6.91",
  "EventReceivedTime": "2017-03-18 16:37:41",
  "SourceModuleName": "in",
  "SourceModuleType": "im_udp"
}
60.3.1. Configuring via the Command Line
-
Connect via SSH to the BIG-IP device. In case of a High Availability (HA) group, make sure you are logged into the active unit. You should see (Active) in the command prompt.
-
Enable the pre-defined default traps as required.
# tmsh modify sys snmp bigip-traps enabled # tmsh modify sys snmp agent-trap enabled # tmsh modify sys snmp auth-trap enabled -
Create an SNMP user (SNMPv3 only).
# tmsh modify sys snmp users add { \
  USERNAME { \
  username USERNAME \
  auth-protocol sha \
  privacy-protocol aes \
  auth-password **** \
  privacy-password **** } }
Example 255. User snmp_user configured for MD5 and AES# tmsh modify sys snmp users add { \ snmpv3_user { \ username snmpv3_user \ auth-protocol md5 \ privacy-protocol aes \ auth-password q1w2e3r4 \ privacy-password q1w2e3r4 } } -
Configure the remote SNMP destination on BIG-IP. Replace
NAME,COMMUNITY,IP_ADDRESS, andPORTwith appropriate values. ReplaceNETWORKwithotherunless traps are going out the management interface, whenmanagementshould be specified instead.# tmsh modify sys snmp traps add { NAME { community COMMUNITY \ host IP_ADDRESS port PORT network NETWORK }Example 256. Sending Traps via SNMPv2This command enables sending SNMPv2 traps to 192.168.6.143.
# tmsh modify sys snmp traps add { 192_168_6_143 { community nxlog \
  host 192.168.6.143 port 162 network other }
In case of SNMPv3, this command needs additional parameters, including security-level, auth-protocol, auth-password, privacy-protocol, and privacy-password.
Example 257. Sending Traps via SNMPv3This command enables sending SNMPv3 traps to 192.168.6.143, using SHA and AES.
# tmsh modify sys snmp traps add { nxlog { \ version 3 \ host 192.168.6.143 \ port 162 \ network other \ security-level auth-privacy \ security-name snmp_user \ auth-protocol sha \ auth-password q1w2e3r4 \ privacy-protocol aes \ privacy-password q1w2e3r4 } }NoteIf the BIG-IP configuration has been previously migrated or cloned, SNMPv3 may not work because the EngineID is not unique. In this case it must be reset as described in K6821. -
In case of a High Availability (HA) group, synchronize the configuration changes to the other units.
# tmsh run cm config-sync to-group GROUP_NAME
60.3.2. Configuring via the Web Interface
-
Log in to the BIG-IP web interface. In case of a High Availability (HA) group, make sure you are logged into the active unit. You should see ONLINE (Active) in the top left corner.
-
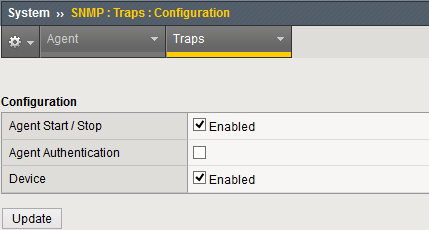
Go to . Select the required SNMP events and click Update.
-
Create an SNMP user (SNMPv3 only). Go to . Click Create and specify the user name, authentication type and password, privacy protocol and password, and access type. Specify an OID value to limit access to certain OIDs, or use
.1to allow full access.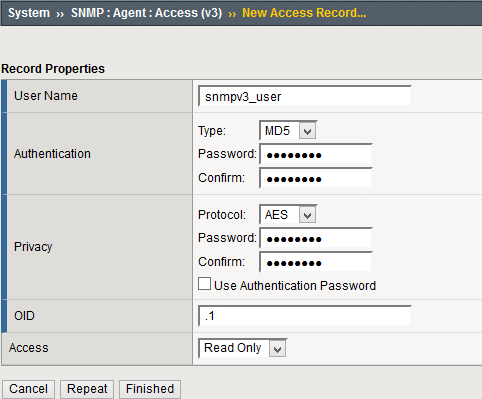
-
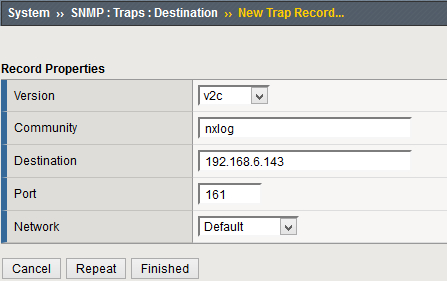
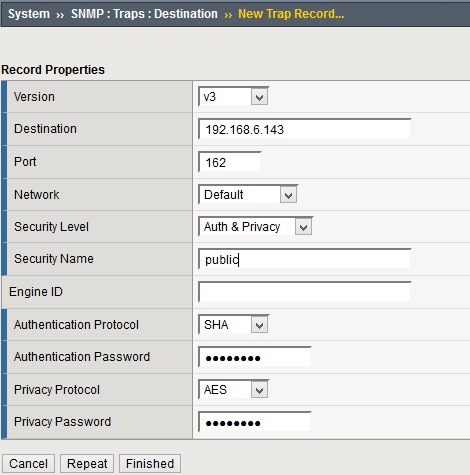
Go to and click Create. Specify the SNMP version, community name, destination IP address, destination port, and network to send traffic to. Then click Finished.
SNMPv3 requires additional parameters. This example matches the settings shown in the NXLog configuration above.
-
In case of a High Availability (HA) group, synchronize the configuration changes to the other units.
-
Click on the yellow Changes Pending in the top left corner.
-
Select the Active unit which should be marked as (Self).
-
Make sure the Sync Device to Group option is chosen and click Sync.
NoteOnce the configuration has been synchronized to all members of the group, each member will be sending logs, inserting its own hostname and IP address. In the event of failover, logging will continue from both units regardless of which one is currently active.
-
60.4. BIG-IP High Speed Logging
F5 BIG-IP devices support High Speed Logging (HSL). This protocol will send as much data as the remote destination is able to accept. Combined with load balancing, BIG-IP makes it possible to have multiple NXLog servers load balanced with one of the available load balancing methods.
BIG-IP is able to send its own logs via HSL in addition to logs for traffic passing through the device. Because the load balancer is usually on the edge of the network and all web traffic passes through it, logging traffic on BIG-IP itself may be an easier and faster solution than processing web server logs on each server separately.
When configuring HSL on BIG-IP, the administrator will have to choose between sending logs via TCP or UDP. TCP can guarantee reliable delivery. However when load balancing traffic between multiple nodes, BIG-IP will reuse existing TCP connections to each node in order to reduce overhead related to creating new connections. This may result in less perfect load balancing between members.
|
Note
|
The steps below have been tested with BIG-IP v12. |
In order to configure HSL on BIG-IP, a node for each NXLog server must be created and then added to a pool. Follow these steps.
-
Log in to BIG-IP via SSH.
-
Create a node for each NXLog agent.
# tmsh create ltm node NAME { address IP_ADDRESS session user-enabled } -
Create a pool with all nodes.
# tmsh create ltm pool NAME { members add { NODE1:PORT { address \
  IP_ADDRESS1 }} NODE2:PORT { address IP_ADDRESS2 }} monitor PROTOCOL }
These commands create a pool named nxlog with one NXLog node.
# tmsh create ltm node nxlog1 { address 192.168.6.143 session user-enabled }
# tmsh create ltm pool nxlog { members add { nxlog1:1514 { address \
  192.168.6.143 }} monitor tcp }
60.4.1. Forwarding BIG-IP Logs to an HSL Pool
To send logs generated on BIG-IP itself to the pool created above, follow these steps.
-
Log in to BIG-IP via SSH.
-
Create a remote logging destination. Replace
NAMEwith a name for the destination,POOLwith the name used above when creating the pool,DISTRIBUTIONwith one of the distribution options shown below, andPROTOCOLwithtcporudp. Distribution options include:- Adaptive
-
Sends traffic to one of the pool members until this member is either unable to process logs at the required rate or the connection is lost.
- Balanced
-
Uses the load balancing method configured on the pool and selects a new member each time it sends data.
- Replicated
-
Sends each log to all members of the pool.
# tmsh create sys log-config destination remote-high-speed-log NAME \ pool-name POOL distribution DISTRIBUTION protocol PROTOCOL -
Create a log publisher. Replace
NAMEwith a name for the publisher andDESTINATIONwith the destination name used in the previous step.# tmsh create sys log-config publisher NAME destinations add {DESTINATION} -
Create a log filter. Replace
NAMEwith a name for the filter,LEVELwith the required logging level between Emergency and Debugging,PUBLISHERwith the name used in the previous step, andSOURCEwith a particular process running on BIG-IP (orall, which sends all logs).# tmsh create sys log-config filter NAME level LEVEL \ publisher PUBLISHER source SOURCE
The following commands will send all logs to the NXLog pool via the TCP protocol.
# tmsh create sys log-config destination remote-high-speed-log nxlog-hsl \
  pool-name nxlog distribution adaptive protocol tcp
# tmsh create sys log-config publisher bigip-local-logs \
  destinations add {nxlog-hsl}
# tmsh create sys log-config filter bigip-all-local-logs level debug \
  publisher bigip-local-logs source all
60.4.2. Forwarding Traffic Logs to an HSL Pool
Configuring BIG-IP to log traffic that goes through the unit is done per virtual server and requires the following steps.
-
Configure NXLog (see the examples below), then restart NXLog.
-
Create a request logging profile. In most cases it is enough to log only requests, however if required the same profile can be configured to log responses and logging errors. Replace
NAMEwith a name for the profile,PROTOCOLwithmds-tcpormds-udp,POOLwith the pool name, andTEMPLATEwith a list of HTTP request fields that will be logged (see the LTM implementation guide).# tmsh create ltm profile request-log NAME { \ request-log-protocol PROTOCOL request-log-pool POOL request-logging enabled \ request-log-template "TEMPLATE" } -
Assign the logging profile to a virtual server. Replace
NAMEwith the virtual server name andLOGGING_PROFILEwith the profile name used in the previous step. A logging profile can be assigned to multiple virtual servers.# tmsh modify ltm virtual NAME {profiles add {LOGGING_PROFILE {}}}Example 260. Logging Traffic to the NXLog PoolThe following commands configure traffic logging to the NXLog pool via TCP.
# tmsh create ltm profile request-log traffic-to-nxlog { \
  request-log-protocol mds-tcp request-log-pool nxlog request-logging enabled \
  request-log-template "client $CLIENT_IP:$CLIENT_PORT request $HTTP_REQUEST \
  server $SERVER_IP:$SERVER_PORT status $HTTP_STATUS" }
# tmsh modify ltm virtual q-web-farm-HTTPS {profiles add {traffic-to-nxlog {}}}
This example shows BIG-IP traffic logs as received and processed by NXLog using im_tcp and xm_syslog.
  1
2
3
4
5
6
7
8
9
10
11
12
13
14
15
16
17
18
19
20

  <Extension _syslog>
    Module  xm_syslog
</Extension>

<Extension _json>
    Module  xm_json
</Extension>

<Input in_syslog_tcp>
    Module  im_tcp
    Host    0.0.0.0
    Port    1514
    Exec    parse_syslog();
</Input>

<Output out>
    Module  om_file
    File    "/var/log/f5.log"
    Exec    to_json();
</Output>
Below is an example of a request being logged in JSON format.
{
  "MessageSourceAddress": "192.168.6.91",
  "EventReceivedTime": "2017-05-10 19:16:43",
  "SourceModuleName": "in_syslog_tcp",
  "SourceModuleType": "im_tcp",
  "SyslogFacilityValue": 1,
  "SyslogFacility": "USER",
  "SyslogSeverityValue": 5,
  "SyslogSeverity": "NOTICE",
  "SeverityValue": 2,
  "Severity": "INFO",
  "EventTime": "2017-05-10 19:16:43",
  "Hostname": "192.168.6.91",
  "Message": "client 192.168.9.78:63717 request GET /cmedia/img/icons/mime/mime-unknown.png?v170509919 HTTP/1.1 server 192.168.6.101:80 status "
}Further field extraction can be done with NXLog according to the sequence of fields specified in the template. For the template string shown above, the following configuration extracts the four fields with a regular expression.
  1
2
3
4
5
6
7
8
9
10
11
12
13
14
15

  <Input in_syslog_tcp>
    Module  im_tcp
    Host    0.0.0.0
    Port    1514
    <Exec>
        parse_syslog();
        if $Message =~ /^client (.*) request (.*) server (.*) status (.*)$/
        {
            $HTTP_Client = $1;
            $HTTP_Request = $2;
            $HTTP_Server = $3;
            $HTTP_Status = $4;
        }
    </Exec>
</Input>
{
  "MessageSourceAddress": "192.168.6.91",
  "EventReceivedTime": "2017-05-10 20:06:24",
  "SourceModuleName": "in_syslog_tcp",
  "SourceModuleType": "im_tcp",
  "SyslogFacilityValue": 1,
  "SyslogFacility": "USER",
  "SyslogSeverityValue": 5,
  "SyslogSeverity": "NOTICE",
  "SeverityValue": 2,
  "Severity": "INFO",
  "EventTime": "2017-05-10 20:06:24",
  "Hostname": "192.168.6.91",
  "Message": "client 192.168.9.78:65275 request GET /?disabledcookies=true HTTP/1.1 server 192.168.6.100:80 status ",
  "HTTP_Client": "192.168.9.78:65275",
  "HTTP_Request": "GET /?disabledcookies=true HTTP/1.1",
  "HTTP_Server": "192.168.6.100:80",
  "HTTP_Status": ""
}
60.4.3. Load Balancing Logs From External Sources via BIG-IP
Having a pool that is balancing traffic between multiple NXLog servers makes it possible to send logs from other servers and devices through BIG-IP. In order to accomplish this, create a virtual server that accepts Syslog traffic.
This example creates a virtual server listening on TCP port 1514 that
forwards logs to the nxlog pool.
# tmsh create ltm virtual nxlog-virtual-server { destination 192.168.6.93:1514 \
  mask 255.255.255.255 pool nxlog profiles add { tcp{} } }
Once this has been set up, log producers can be configured to forward Syslog logs to 192.168.6.93.