48. Cisco ASA
Cisco Adaptive Security Appliance (ASA) devices are capable of sending their logs to a remote Syslog destination via TCP or UDP. When sending logs over the network, it is recommended to use TCP as the more reliable protocol. With UDP there is a potential to lose entries, especially when there is a high volume of messages.
Apr 15 2017 00:21:14 192.168.12.1 : %ASA-5-111010: User 'john', running 'CLI' from IP 0.0.0.0, executed 'dir disk0:/dap.xml'
Apr 15 2017 00:22:27 192.168.12.1 : %ASA-4-313005: No matching connection for ICMP error message: icmp src outside:81.24.28.226 dst inside:72.142.17.10 (type 3, code 0) on outside interface. Original IP payload: udp src 72.142.17.10/40998 dst 194.153.237.66/53.
Apr 15 2017 00:22:42 192.168.12.1 : %ASA-3-710003: TCP access denied by ACL from 179.236.133.160/8949 to outside:72.142.18.38/23
For more details about configuring Syslog on Cisco ASA, check the Cisco configuration guide for the ASA or Adaptive Security Device Manager (ASDM) version in use.
|
Note
|
The steps below have been tested with ASA 9.x and ASDM 7.x, but should work for other versions also. |
48.1. Forwarding Cisco ASA Logs Over TCP
-
Configure NXLog for receiving Syslog via TCP (see the examples below). Then restart NXLog.
-
Make sure the NXLog agent is accessible from each of the ASA devices being configured.
-
Set up Syslog logging using either the command line or ASDM. See the following sections.
This example shows Cisco ASA logs as received and processed by NXLog.
  1
2
3
4
5
6
7
8
9
10
11
12
13
14
15
16
17
18
19
20

  <Extension _syslog>
    Module  xm_syslog
</Extension>

<Extension _json>
    Module  xm_json
</Extension>

<Input in_syslog_tcp>
    Module  im_tcp
    Host    0.0.0.0
    Port    1514
    Exec    parse_syslog();
</Input>

<Output file>
    Module  om_file
    File    "/var/log/asa.log"
    Exec    to_json();
</Output>
Logs like the sample at the beginning of the chapter will result in the following output.
{
  "MessageSourceAddress": "192.168.12.1",
  "EventReceivedTime": "2017-04-15 00:19:53",
  "SourceModuleName": "in_syslog_tcp",
  "SourceModuleType": "im_tcp",
  "SyslogFacilityValue": 20,
  "SyslogFacility": "LOCAL4",
  "SyslogSeverityValue": 5,
  "SyslogSeverity": "NOTICE",
  "SeverityValue": 2,
  "Severity": "INFO",
  "Hostname": "192.168.12.1",
  "EventTime": "2017-04-15 00:21:14",
  "Message": "%ASA-5-111010: User 'john', running 'CLI' from IP 0.0.0.0, executed 'dir disk0:/dap.xml'"
}
{
  "MessageSourceAddress": "192.168.12.1",
  "EventReceivedTime": "2017-04-15 00:21:06",
  "SourceModuleName": "in_syslog_tcp",
  "SourceModuleType": "im_tcp",
  "SyslogFacilityValue": 20,
  "SyslogFacility": "LOCAL4",
  "SyslogSeverityValue": 4,
  "SyslogSeverity": "WARNING",
  "SeverityValue": 3,
  "Severity": "WARNING",
  "Hostname": "192.168.12.1",
  "EventTime": "2017-04-15 00:22:27",
  "Message": "%ASA-4-313005: No matching connection for ICMP error message: icmp src outside:81.24.28.226 dst inside:72.142.17.10 (type 3, code 0) on outside interface. Original IP payload: udp src 72.142.17.10/40998 dst 194.153.237.66/53."
}
{
  "MessageSourceAddress": "192.168.12.1",
  "EventReceivedTime": "2017-04-15 00:21:21",
  "SourceModuleName": "in_syslog_tcp",
  "SourceModuleType": "im_tcp",
  "SyslogFacilityValue": 20,
  "SyslogFacility": "LOCAL4",
  "SyslogSeverityValue": 3,
  "SyslogSeverity": "ERR",
  "SeverityValue": 4,
  "Severity": "ERROR",
  "Hostname": "192.168.12.1",
  "EventTime": "2017-04-15 00:22:42",
  "Message": "%ASA-3-710003: TCP access denied by ACL from 179.236.133.160/8949 to outside:72.142.18.38/23"
}
The contents of the message can be parsed to extract additional fields.
The following configuration extracts the message ID from the $Message field.
  1
2
3
4
5
6
7
8
9
10
11
12
13
14

  <Input in_syslog_tcp>
    Module im_tcp
    Host 0.0.0.0
    Port 1514
    <Exec>
        parse_syslog();
        if $Message =~ /^%(ASA)-(\d)-(\d{6}): (.*)$/
        {
            $ASASeverityNumber = $2;
            $ASAMessageID = $3;
            $ASAMessage = $4;
        }
    </Exec>
</Input>
{
  "MessageSourceAddress": "192.168.12.1",
  "EventReceivedTime": "2017-04-15 14:27:04",
  "SourceModuleName": "in_syslog_tcp",
  "SourceModuleType": "im_tcp",
  "SyslogFacilityValue": 20,
  "SyslogFacility": "LOCAL4",
  "SyslogSeverityValue": 3,
  "SyslogSeverity": "ERR",
  "SeverityValue": 4,
  "Severity": "ERROR",
  "Hostname": "  192.168.12.1",
  "EventTime": "2017-04-15 14:28:26",
  "Message": "%ASA-3-710003: TCP access denied by ACL from 117.247.81.21/52569 to outside:72.142.18.38/23",
  "ASASeverityNumber": "3",
  "ASAMessageID": "710003",
  "ASAMessage": "TCP access denied by ACL from 117.247.81.21/52569 to outside:72.142.18.38/23"
}
Further field extraction can be done based on message ID. Detailed information on existing IDs and their formats can be found in the Cisco ASA Series Syslog Messages book.
The following NXLog configuration parses a very common firewall message: "TCP access denied by ACL".
  1
2
3
4
5
6
7
8
9
10
11
12
13
14
15
16
17
18
19

  <Input in_syslog_tcp>
    Module im_tcp
    Host 0.0.0.0
    Port 1514
    <Exec>
        parse_syslog();
        if $Message =~ /(?x)^%ASA-3-710003:\ TCP\ access\ denied\ by\ ACL\ from
                        \ ([0-9.]*)\/([0-9]*)\ to\ outside:([0-9.]*)\/([0-9]*)/
        {
            $ASASeverityNumber = "3";
            $ASAMessageID = "710003";
            $ASAMessage = "TCP access denied by ACL";
            $ASASrcIP = $1;
            $ASASrcPort = $2;
            $ASADstIP = $3;
            $ASADstPort = $4;
        }
    </Exec>
</Input>
{
  "MessageSourceAddress": "192.168.12.1",
  "EventReceivedTime": "2017-04-15 15:10:20",
  "SourceModuleName": "in_syslog_tcp",
  "SourceModuleType": "im_tcp",
  "SyslogFacilityValue": 20,
  "SyslogFacility": "LOCAL4",
  "SyslogSeverityValue": 3,
  "SyslogSeverity": "ERR",
  "SeverityValue": 4,
  "Severity": "ERROR",
  "Hostname": "192.168.12.1",
  "EventTime": "2017-04-15 15:11:43",
  "Message": "%ASA-3-710003: TCP access denied by ACL from 119.80.179.109/2083 to outside:72.142.18.38/23",
  "ASASeverityNumber": "3",
  "ASAMessageID": "710003",
  "ASAMessage": "TCP access denied by ACL",
  "ASASrcIP": "119.80.179.109",
  "ASASrcPort": "2083",
  "ASADstIP": "72.142.18.38",
  "ASADstPort": "23"
}
48.1.1. Configuring via Command Line
To configure Cisco ASA Syslog logging from the command line, follow these steps.
-
Log in to the ASA device via SSH.
-
Enable logging.
# logging enable -
In case of a High Availability (HA) pair, enable logging on the standby unit.
# logging standby -
Specify the Syslog facility. Replace
FACILITYwith a number from 16 to 23, corresponding tolocal0throughlocal7(the default is 20, orlocal4).# logging facility FACILITY -
Specify the severity level. Replace
LEVELwith a number from 0 to 7. Use the maximum level for which messages should be generated (severity level 3 will produce messages for levels 3, 2, 1, and 0). The levels correspond to the Syslog severities.# logging trap LEVEL -
Allow ASA to pass traffic when the Syslog server is not available.
# logging permit-hostdownNoteIf logs are being sent via TCP and this setting is not configured, ASA will stop passing traffic when the Syslog server is unavailable. -
Configure the Syslog host. Replace
IP_ADDRESSandPORTwith the remote IP address and port that NXLog is listening on.# logging host inside IP_ADDRESS tcp/PORTNoteTo enable SSL/TLS for connections to the NXLog agent, add secureat the end of the above command. The im_ssl module will need to be used when configuring NXLog.Example 211. Redirecting Logs to 192.168.6.143This command configures 192.168.6.143 as the Syslog host, with TCP port 1514.
# logging host inside 192.168.6.143 tcp/1514 -
Apply the configuration.
# write memory
48.1.2. Configuring via ASDM
To configure remote logging via ASDM, follow these steps.
-
Connect and log in to the GUI.
-
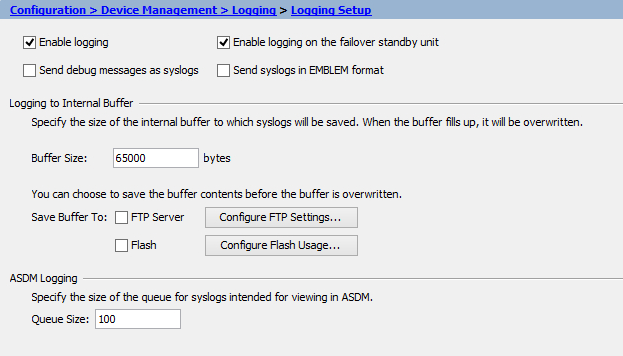
Go to and make sure Enable Logging is selected. In case of a High Availability (HA) pair, Enable logging on the failover standby unit should also be selected. Click Apply.
-
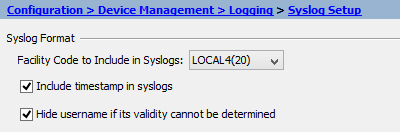
Go to Syslog Setup and specify the Facility Code (the default is 20). Click Apply.
-
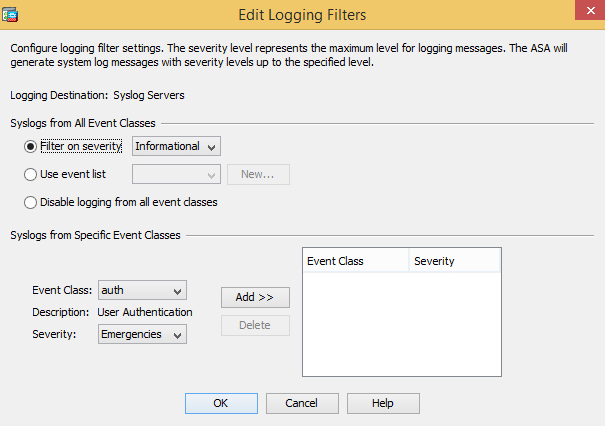
Go to Logging Filters, select Syslog Servers, click Edit and specify the severity level. Click OK and then Apply.
-
Go to Syslog Servers and select Allow user traffic to pass when TCP syslog server is down. Click Apply.
NoteThis setting is important to avoid downtime during TCP logging in case the Syslog server is unavailable. -
Under Syslog Servers, click Add and specify the interface, remote IP address, protocol and port. Click OK and then Apply.
 Note
NoteTo enable SSL/TLS for connections to the NXLog agent, select the Enable secure syslog using SSL/TLS option. The im_ssl module will need to be used when configuring NXLog. -
Click Save to save the configuration.
48.2. NetFlow From Cisco ASA
NetFlow is a protocol used by Cisco devices that provides the ability to send details about network traffic to a remote destination. NXLog is capable of receiving NetFlow logs. The steps below outline the configuration required to send information about traffic passing through Cisco ASA to NXLog via UDP.
-
Configure NXLog for receiving NetFlow via UDP/2162 (see the example below). Then restart NXLog.
-
Make sure the NXLog agent is accessible from each of the ASA devices being configured.
-
Set up NetFlow logging on Cisco ASA, using either the command line or ASDM. See the following sections.
|
Note
|
The steps below have been tested with ASA 9.x and ASDM 7.x, but should work for other versions also. |
This example shows NetFlow logs as received and processed by NXLog.
  1
2
3
4
5
6
7
8
9
10
11
12
13
14
15
16
17
18
19
20

  <Extension netflow>
    Module      xm_netflow
</Extension>

<Extension _json>
    Module      xm_json
</Extension>

<Input in_netflow_udp>
    Module      im_udp
    Host        0.0.0.0
    Port        2162
    InputType   netflow
</Input>

<Output file>
    Module      om_file
    File        "/var/log/netflow.log"
    Exec        to_json();
</Output>
{
  "Version": 9,
  "SysUpTimeMilisec": 2374222958,
  "ExportTime": "2017-05-17 18:39:05",
  "TimeMsecStart": "2017-05-17 18:38:04",
  "Protocol": 6,
  "SourcePort": 64394,
  "DestPort": 443,
  "SourceIpV4Address": "192.168.13.37",
  "DestIpV4Address": "172.217.3.135",
  "inputSNMPIface": 4,
  "outputSNMPIface": 3,
  "ASAeventTime": "2017-05-17 18:39:05",
  "ASAconnID": 41834207,
  "FNF_ICMPCode": 0,
  "FNF_ICMPType": 0,
  "ASAevent": 1,
  "ASAextEvent": 0,
  "ASA_XlateSourcePort": 64394,
  "ASA_XlateDestPort": 443,
  "ASA_V4XlateSourceAddr": "72.142.18.38",
  "ASA_V4XlateDestAddr": "172.217.3.135",
  "ASA_IngressACL": "433a1af1a925365e00000000",
  "ASA_EgressACL": "000000000000000000000000",
  "ASA_UserName20": "",
  "MessageSourceAddress": "192.168.12.1",
  "EventReceivedTime": "2017-05-17 18:36:32",
  "SourceModuleName": "udpin",
  "SourceModuleType": "im_udp"
}
{
  "Version": 9,
  "SysUpTimeMilisec": 2374222958,
  "ExportTime": "2017-05-17 18:39:05",
  "TimeMsecStart": "2017-05-17 18:38:04",
  "Protocol": 17,
  "SourcePort": 65080,
  "DestPort": 443,
  "SourceIpV4Address": "192.168.13.37",
  "DestIpV4Address": "216.58.216.206",
  "inputSNMPIface": 4,
  "outputSNMPIface": 3,
  "ASAeventTime": "2017-05-17 18:39:05",
  "ASAconnID": 41834203,
  "FNF_ICMPCode": 0,
  "FNF_ICMPType": 0,
  "ASAevent": 1,
  "ASAextEvent": 0,
  "ASA_XlateSourcePort": 65080,
  "ASA_XlateDestPort": 443,
  "ASA_V4XlateSourceAddr": "72.142.18.38",
  "ASA_V4XlateDestAddr": "216.58.216.206",
  "ASA_IngressACL": "433a1af1a925365e00000000",
  "ASA_EgressACL": "000000000000000000000000",
  "ASA_UserName20": "",
  "MessageSourceAddress": "192.168.12.1",
  "EventReceivedTime": "2017-05-17 18:36:32",
  "SourceModuleName": "udpin",
  "SourceModuleType": "im_udp"
}
48.2.1. Configuring NetFlow via Command Line
To configure Cisco ASA NetFlow logging, follow these steps.
-
Log in to ASA via SSH.
-
Create a NetFlow destination. Replace
IP_ADDRESSandPORTwith the address and port that the NXLog agent is listening on.# flow-export destination inside IP_ADDRESS PORT -
Create an access list matching the traffic that needs to be logged. Replace
ACL_NAMEwith a name for the access list. ReplacePROTOCOL,SOURCE_IP, andDESTINATION_IPwith appropriate values corresponding to the traffic to be matched.# access-list ACL_NAME extended permit PROTOCOL SOURCE_IP DESTINATION_IP -
Create a class map with the access list. Replace
ACL_NAMEwith the access list name used in the previous step.# class-map global-class # match access-list ACL_NAME -
Add NetFlow destination to global policy. Replace
IP_ADDRESSwith the address that the NXLog agent is listening on.# policy-map global_policy # class global-class # flow-export event-type all destination IP_ADDRESS
These commands enable NetFlow logging of all traffic to 192.168.6.143 via UDP port 2162.
# flow-export destination inside 192.168.6.143 2162
# access-list global_mpc extended permit ip any any
# class-map global-class
# match access-list global_mpc
# policy-map global_policy
# class global-class
# flow-export event-type all destination 192.168.6.143
48.2.2. Configuring NetFlow via ASDM
To configure Cisco ASA NetFlow logging via ASDM, follow these steps.
-
Connect and log in to the GUI.
-
Go to .
-
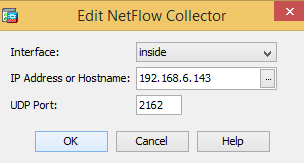
Click Add and specify the interface, remote IP address, and port that the NXLog agent is listening on.
-
Go to .
-
Click Add, switch to Global, and click Next.
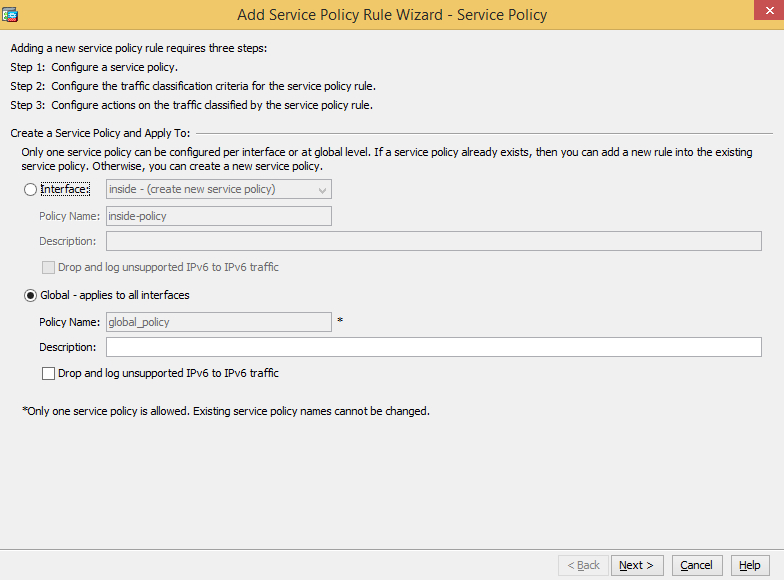
-
Select Source and Destination IP Address (uses ACL) and click Next.
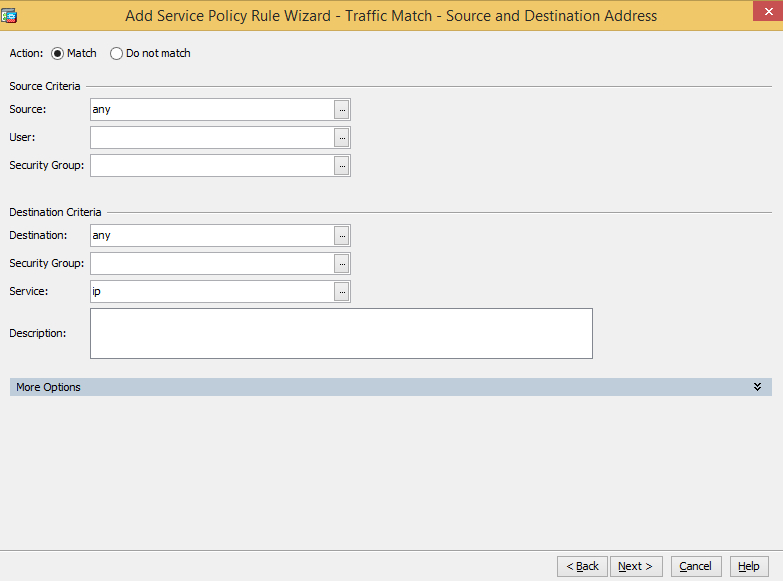
-
Specify the source and destination criteria. The example below matches all traffic.
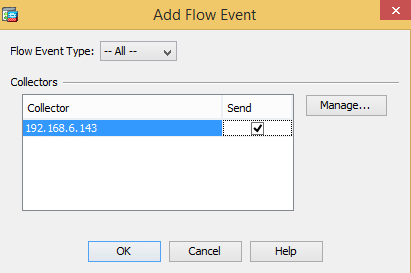
-
Go to the NetFlow tab and add the NetFlow destination created during the first step. Make sure the Send option is selected.
-
Click OK and Finish.