113. Installation
113.1. Installing on Debian Wheezy
Install the DEB package with the following commands:
# dpkg -i nxlog-manager_X.X.XXX_amd64.deb
# apt-get -f install
113.1.1. Requirements
-
nxlog-manager-4.x requires openjdk-7-jre and
-
nxlog-manager-5.x requires either openjdk-7-jre or openjdk-8-jre.
If Java is not installed or the correct version of Java is not selected, NXLog Manager will refuse to start. To select the default version of Java on your system, use the command:
# update-alternatives --config java
|
Warning
|
Make sure that your hostname and DNS settings are setup correctly, to avoid problems with NXLog Manager. Refer to host setup common issues for more information. |
113.2. Installing on RHEL 6 & 7
Install the .rmp package with the following command:
# yum localinstall nxlog-manager-X.X.XXXX-1.noarch.rpm
|
Note
|
nxlox-manager-4.x requires java-1.7.0-openjdk and nxlox-manager-5.x requires either java-1.7.0-openjdk or java-1.8.0-openjdk. If Java is not installed or the correct version of Java is not selected NXLog Manager will refuse to start. To select the default version of Java on your system, use the command: |
# alternatives --config javaTo access the web interface from another host, the firewall rules should allow access to port 9090 from the external network:
# iptables -A INPUT -p tcp --dport 9090 -j ACCEPTOr completely remove all firewall rules while testing:
# iptables -F|
Warning
|
Make sure that your hostname and DNS settings are setup correctly, to avoid problems with NXLog Manager. Refer to host setup common issues for more information. |
113.3. Installing as Docker Application
To install NXLog Manager as a Docker application, Docker Engine and Docker Compose tool is required. The procedure is identical on all platforms supported by Docker (Linux, Windows and MacOS). Extract the files from the compressed Docker archive.
$ tar zxf nxlog-manager-X.X.XXXX-docker.tar.gzTo build, (re)create and start the container execute the following command.
$ docker-compose up -dBy default the Dockerized NXLog Manager listens on port 9090. The port
configuration is defined as HOST:CONTAINER. To change this setting, edit the
docker-compose.yml file by modifying the HOST port number preceding the
colon (9080 in the below example). The port number for the CONTAINER,
following the colon should be left at 9090.
ports:
  - "4041:4041"
  - "9080:9090"
restart: always
For the configuration change to take effect, the Docker container needs to be stopped and started with the following commands.
$ sudo docker-compose down
$ sudo docker-compose up
|
Note
|
The NXLog Manager Docker container includes MySQL. Therefore there is no need to install and configure MySQL separately. After installing, you may proceed with the NXLog Manager configuration. |
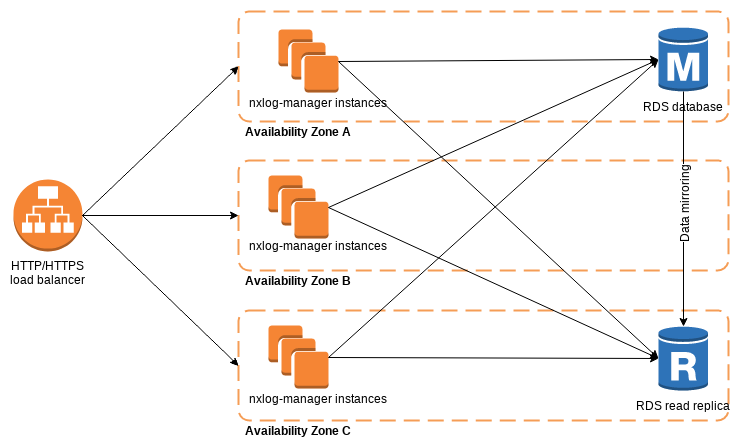
113.4. Deploying on AWS
NXLog Manager can be deployed in a cloud environment such as Amazon Web Services. Cloud services can be easily leveraged in order to provide high availability and disaster recovery capabilities. In such a scenario, NXLog Manager will be deployed in a distributed setup across multiple availability zones.
113.4.1. Setting up NXLog Manager on AWS
-
To start with, the database needs to be prepared. The Amazon Relational Database Service (RDS) works well with NXLog Manager. For data redundancy, create a database (MySQL or MariaDB) in Multi-AZ deployment mode. This option will create a read replica.

-
Install NXLog Manager from the DEB or RPM package, depending on the operating system. At least the EC2 "t2.small" instance type is recommended.
-
Edit
/opt/nxlog-manager/db_init/db.conf. Add the RDS hostname and the database master username/password to theMYSQLOPTSvariable.MYSQLOPTS="-h RDS_INSTANCE.rds.amazonaws.com -P 3306 -u DB_MASTER_USER -pDB_PASSWORD" -
Execute the database initialization script. This should only be done once for the cluster!
# cd /opt/nxlog-manager/db_init
# ./dbinit.sh
-
Configure NXLog Manager to run in a distributed manner by editing the
INSTANCE_MODEin/opt/nxlog-manager/conf/nxlog-manager.conf.INSTANCE_MODE=distributed-manager -
In
/opt/nxlog-manager/conf/jetty-env.xml, provide details for Java Message Service (JMS) communication.-
Set
JMSBrokerAddressto the instance private IP, used for communications inside the VPC.<Set name="jmsBrokerAddress">172.31.9.100</Set> -
Set database details in
jdbcUrlby providing the RDS endpoint.<Set name="jdbcUrl">jdbc:mysql://RDS_INSTANCE.rds.amazonaws.com:3306/nxlog-manager5?useUnicode=true&characterEncoding=UTF-8&characterSetResults=UTF-8&autoReconnect=true</Set> -
Update
Log4ensicsDatabaseAccess.<New class="co.nxlog.manager.data.bean.common.DatabaseAccessBean"> <Set name="databaseName">nxlog-manager5</Set> <Set name="username">nxlog-manager5</Set> <Set name="password">nxlog-manager5</Set> <Set name="location">RDS_INSTANCE.rds.amazonaws.com:3306</Set> </New>
-
-
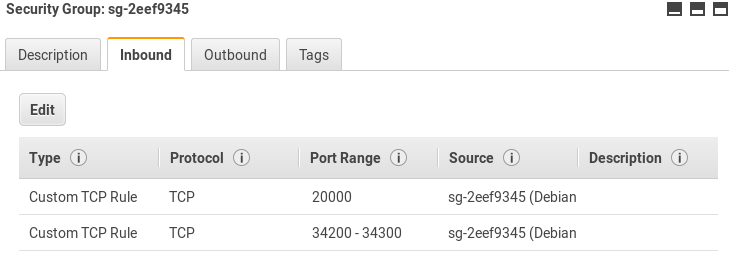
From the EC2 service dashboard, go to Security Groups. Allow TCP traffic on ports 20000 and 34200-34300 to allow JMS communications inside the security group created for NXLog Manager EC2 instances. Please note that the security group ID should be used in the Source field.
-
The nxlog-manager service can now be started.
# service nxlog-manager start
113.4.2. Configuring Load Balancing
In order to access NXLog Manager from a single URL, as well as benefit from application redundancy, a Load Balancer is needed.
-
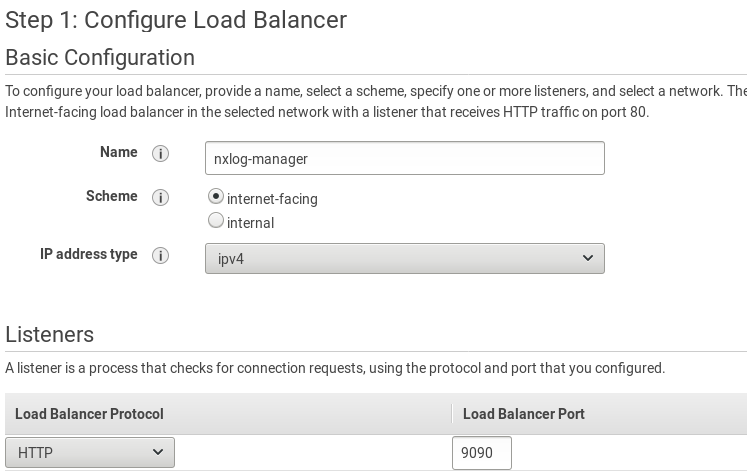
From the EC2 service dashboard, go to Load Balancing. Click Create Load Balancer. Select Application Load Balancer and click Create.
-
Configure the load balancer. Set the listener to use port 9090 (the same as the backend application).
-
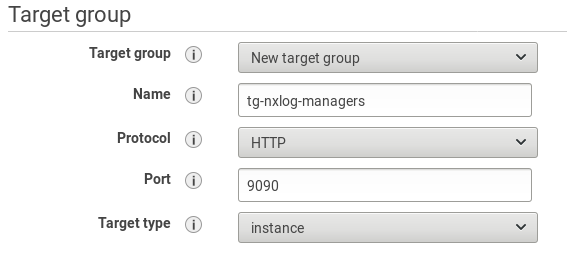
Choose availability zones and configure a security group in order to limit access to the load balancer. Configure routing to forward requests to port 9090.
-
Configure the health check path to
/nxlog-manager. In Advanced health check settings, set the Success codes to 302, as it is the default reply from the nxlog-manager service.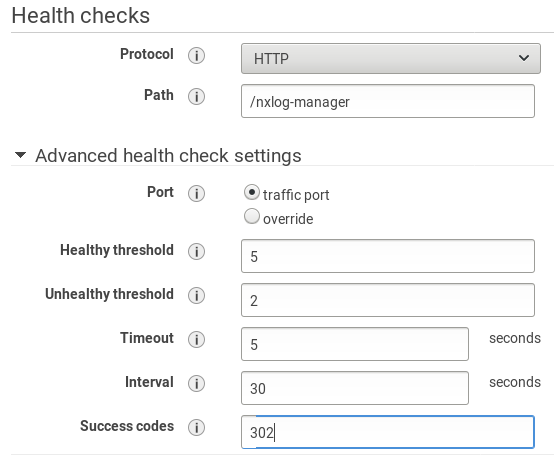
-
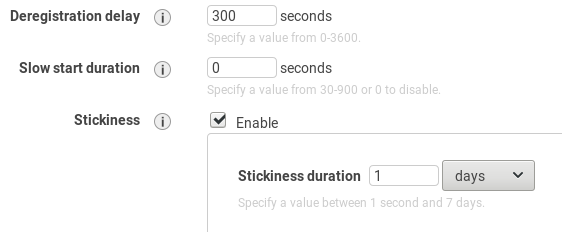
Select instances for the target group and finish creation of the load balancer. From the EC2 dashboard, go to Target Groups (in the LOAD BALANCING section). Select the target group and click Edit attributes. Enable Stickiness to prevent breaking user sessions. This will create a cookie named AWSALB with encrypted contents.
-
Edit security groups to allow traffic between the load balancer and its target group. After this step, the solution is ready.

113.5. Configuring NXLog Manager for Standalone Mode
To operate in standalone mode, NXLog Manager requires MySQL or MariaDB v5.5.
113.5.1. Installing MySQL Server Debian or Ubuntu
Install the mysql-server package:
# apt-get install mysql-server|
Note
|
MariaDB has replaced MySQL in more recent versions such as Debian (Stretch). |
Start the mysql-server service:
# service mysqld start|
Note
|
systemctl has replaced service in more recent versions such as Debian (Stretch). |
Now you may proceed with the Database Initialization step.
113.5.2. Installing MySQL Server on CentOS 6 or RHEL 6
Install the mysql-server package:
# yum install mysql-serverStart the mysql-server service:
# service mysqld startNow you may proceed with the Database Initialization step.
113.5.3. Installing MariaDB Server CentOS 7 or RHEL 7
MariaDB has replaced MySQL as the default package on CentOS7 and RHEL 7. MariaDB is a fork of MySQL and should work seamlessly in place of MySQL. Install the mariadb-server package:
# yum install mariadb-serverStart the mysql-server service:
# systemctl start mariadbNow you may proceed with the Database Initialization step.
113.6. Configuring NXLog Manager for Cluster Mode
It is possible to run multiple instances of NXLog Manager so that a group of agents connect to a specific Manager instance and all agents can be managed at the same time from either NXLog Manager instance no matter which one they are connected to. This mode is referred to as distributed mode or cluster mode.
The following needs to be set in the
/opt/nxlog-manager/conf/nxlog-manager.conf configuration file on each
instance:
INSTANCE_MODE=distributed-manager
The NXLog Manager instances communicate over JMS (Java Message Service) API.
Please set
the public IP address of the interface in
/opt/nxlog-manager/conf/jetty-env.xml and make sure to replace the
value 127.0.0.1 set for JMSBrokerAddress with the public IP:
<Set name="jmsBrokerAddress">10.0.0.42</Set>To operate in clustered mode, NXLog Manager requires MariaDB Galera Cluster v5.5.
113.6.1. Installing MariaDB Galera Cluster on Debian or Ubuntu
There is a very good installation guide here. The MariaDB Galera Cluster installation and configuration steps are summarized below.
Add the package repository:
# apt-get install python-software-properties
# apt-key adv --recv-keys --keyserver keyserver.ubuntu.com 0xcbcb082a1bb943db
For Debian Wheezy:
# add-apt-repository 'deb http://mirror3.layerjet.com/mariadb/repo/5.5/debian wheezy main'For Ubuntu Precise:
# add-apt-repository 'deb http://mirror3.layerjet.com/mariadb/repo/5.5/ubuntu precise main'Resynchronize the package index files:
# apt-get updateInstall the packages:
# DEBIAN_FRONTEND=noninteractive apt-get install -y rsync galera mariadb-galera-serverAdd the following to /etc/mysql/conf.d/galera.cnf:
[mysqld]
#mysql settings
binlog_format=ROW
default-storage-engine=innodb
innodb_autoinc_lock_mode=2
query_cache_size=0
query_cache_type=0
bind-address=0.0.0.0
#galera settings
wsrep_provider=/usr/lib/galera/libgalera_smm.so
wsrep_cluster_name="my_wsrep_cluster"
wsrep_cluster_address="gcomm://<IP1>,<IP2>,...,<IPN>"
wsrep_sst_method=rsync
Here IP1,…,IPN are the addresses of all nodes in the Galera cluster. Distribute this file to all nodes.
Start the Galera cluster.
First stop all nodes:
On node1:
# service mysql stopOn node2:
# service mysql stopOn nodeN:
# service mysql stopStart the central node:
On node1:
# service mysql start --wsrep-new-clusterThen start on all other nodes:
On node2:
# service mysql start
 [ ok ] Starting MariaDB database server: mysqld . . . . . . . . . ..
 [info] Checking for corrupt, not cleanly closed and upgrade needing tables..
On nodeN:
# service mysql start
 [ ok ] Starting MariaDB database server: mysqld . . . . . . . . . ..
 [info] Checking for corrupt, not cleanly closed and upgrade needing tables..
Verify all nodes are running:
# mysql -u root -e 'SELECT VARIABLE_VALUE as "cluster size" FROM INFORMATION_SCHEMA.GLOBAL_STATUS WHERE VARIABLE_NAME="wsrep_cluster_size"'This command should return N, i.e. the number of cluster nodes.
113.6.2. Installing MariaDB Galera Cluster on RHEL
There is an installation guide here. The MariaDB Galera Cluster installation and configuration steps are summarized below.
To add the MariaDB repository create the file
/etc/yum.repos.d/mariadb.repo with the following content:
[mariadb]
name = MariaDB
baseurl = http://yum.mariadb.org/5.5/centos6-amd64
gpgkey=https://yum.mariadb.org/RPM-GPG-KEY-MariaDB
gpgcheck=1
Now install MariaDB and Galera:
# yum install MariaDB-Galera-server MariaDB-client galeraYou can download and install 'socat' here in case of the following error:
Error: Package: MariaDB-Galera-server-5.5.40-1.el6.x86_64 (mariadb)
           Requires: socat
 You could try using --skip-broken to work around the problem
To create an initial MariaDB configuration, execute these commands and follow the instructions:
# service mysql start
# mysql_secure_installation
# mysql -u root -p
 MariaDB [(none)]> GRANT ALL PRIVILEGES ON *.* TO 'root'@'%' IDENTIFIED BY 'password' WITH GRANT OPTION;
 MariaDB [(none)]> FLUSH PRIVILEGES;
 MariaDB [(none)]> exit
# service mysql stop
On each cluster node, edit /etc/my.cnf.d/server.cnf and make sure to
add the following content:
[mysqld]
pid-file        = /var/lib/mysql/mysqld.pid
port            = 3306

[mariadb]
query_cache_size=0
binlog_format=ROW
default_storage_engine=innodb
innodb_autoinc_lock_mode=2
wsrep_provider=/usr/lib64/galera/libgalera_smm.so
wsrep_cluster_address=gcomm://IP2,...,IPN
wsrep_cluster_name='cluster1'
wsrep_node_address='IP1'
wsrep_node_name='db1'
wsrep_sst_method=rsync
wsrep_sst_auth=root:password
Make sure to set the values appropriately on each node.
Start the cluster node using following command:
# /etc/init.d/mysql bootstrap
Bootstrapping the cluster.. Starting MySQL.... SUCCESS!
On the other nodes start, with the following command:
# service mysql start
Starting MySQL.... SUCCESS!
SELinux may block MariaDB from binding on the cluster port and it will
print the following error in the MariaDB error log in /etc/selinux/config:
140805  7:56:00 [Note] WSREP: gcomm: bootstrapping new group '’cluster1’'
140805  7:56:00 [ERROR] WSREP: Permission denied
140805  7:56:00 [ERROR] WSREP: failed to open gcomm backend connection: 13: error while trying to listen 'tcp://0.0.0.0:4567?socket.non_blocking=1', asio error 'Permission denied': 13 (Permission denied)
This can be solved by running setenforce 0 and setting SELINUX=permissive.
Then repeat the above installation steps on each node.
113.7. Database Initialization
The NXLog Manager needs its initial configuration data to be loaded into the configuration database.
|
Note
|
If you are installing NXLog Manager in clustered mode, this only needs to be executed once for the DB cluster - i.e. only on the first node. |
If a root password is set for the MySQL/MariaDB database,
edit /opt/nxlog-manager/db_init/my.cnf and provide the password:
[client]
password=
Execute the database initialization script (only once for the Galera cluster):
$ cd /opt/nxlog-manager/db_init
# ./dbinit.sh
To ensure that the MySQL/MariaDB database is started on boot on CentOS/RHEL distributions, execute the following command:
# chkconfig mysqld on
or
# chkconfig mariadb on
The size of the maximum packet allowed by MySQL/MariaDB can be
raised by adding the following to the global configuration options,
typically /etc/my.cnf or /etc/mysql/my.cnf.
Raising the size of the maximum allowed packet will eliminate any
max_allowed_packet exceeded error messages from the log files.
[mysqld]
max_allowed_packet = 256M
113.8. Starting NXLog Manager
-
Start NXLog Manager with the following command:
-
Starting NXLog Manager on Debian Wheezy or RHEL6/CentOS6
# service nxlog-manager start -
Starting NXLog Manager on Debian Stretch or RHEL7/CentOS7
# systemctl start nxlog-manager
-
-
Connect to the web interface. Launch a web browser and navigate to http://x.x.x.x:9090/nxlog-manager in order to make sure the start was successful.
|
Note
|
Check the logs under |
|
Note
|
Running NXLog Manager directly can provide additional information
if the NXLog Manager service fails to start.
Run |
113.9. NXLog Agent Installation
113.9.2. Installing on RHEL
To install the NXLog agent on RHEL, issue the following command:
# rpm -ivh nxlog-X.X.XXXX-1.x86_64.rpmDepending on the package there may be additional dependencies required to be installed:
# yum install dialog apr perl perl-DBI perl-JSON openssl pcre zlib expat libcap libdbi113.9.3. Installing on Windows
On Windows, run the MSI installer. You should be greeted by the following screens:
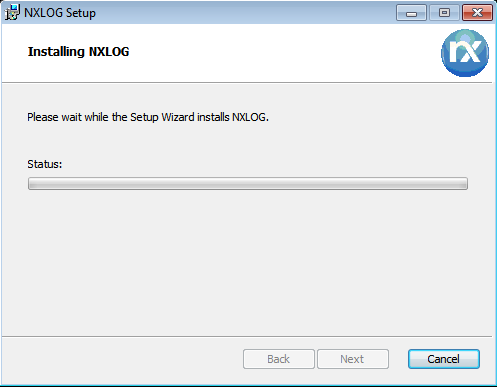
Simply click Next, accept the license agreement, then finish the installation.
It is possible to automate the installation on Windows using msiexec:
> msiexec /i nxlog-xxx.msi /quietThe MSI can be also installed from Group Policy.
113.10. NXLog Manager Configuration
Once the nxlog-manager service is running, you should be able to access
the web interface at http://x.x.x.x:9090/nxlog-manager.
The default access credentials are as follows:
User ID: admin
Password: nxlog123
113.10.1. Set Session and Screen Lock (User Interface) Timeouts
It is sometimes desirable to limit the time an NXLog Manager session remains active, or how long the screen remains unlocked, after authentication.
To set how long the NXLog Manager UI waits before requiring user
re-authentication, find the screenLockIdleTimeB block in conf/jetty-env.xml
and then set screenLockIdleTime to the desired value. To control the active
session length, find the applicationSettingsB block and then set
sessionTimeout to the desired value. Note that sessionTimeout must be larger
than screenLockIdleTime for screen lock to work. Values are in minutes.
The following example shows the directives in context. Note that other directives have been omitted from the example to aid readability.
<New id="applicationSettingsB" class="org.eclipse.jetty.plus.jndi.Resource">
    <Arg/>
    <Arg>bean/applicationSettingsBean</Arg>
    <Arg>
        <New class="com.nxsec.log4ensics.data.bean.common.ApplicationSettingsBean">
            <!--Session Timeout set to 15 minutes-->
            <Set name="sessionTimeout">10</Set>
        </New>
    </Arg>
</New>
<New id="screenLockIdleTimeB" class="org.eclipse.jetty.plus.jndi.Resource">
    <Arg/>
    <Arg>bean/screenLockIdleTimeBean</Arg>
    <Arg>
        <New class="com.nxsec.log4ensics.data.bean.common.ScreenLockIdleTimeBean">
            <!--Screen Lock Idle Time set to 10 minutes-->
            <Set name="screenLockIdleTime">10</Set>
        </New>
    </Arg>
</New>
113.10.2. Installation Wizard
When the administrator logs in the first time, a dialog window will be displayed to help with the initial configuration: 'You don’t have a default CA and AgentManager certificate. Do you want to create a CA and a CERT?' Click Yes to proceed with the CA setup.
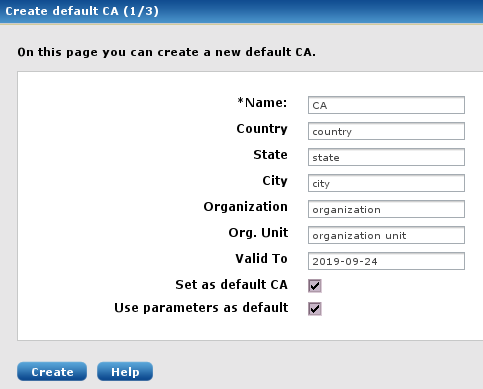
Fill in the form and then click Create.
The next dialog window will ask to create a certificate for the Agent manager.
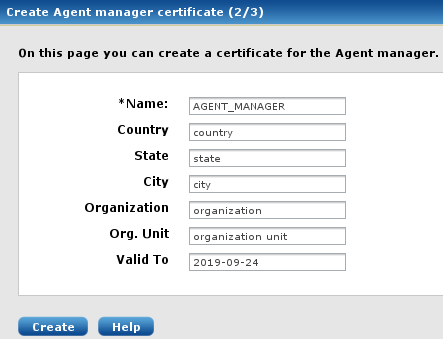
Fill in the form and then click Create.
Finally the NXLog Manager settings need to be provided.
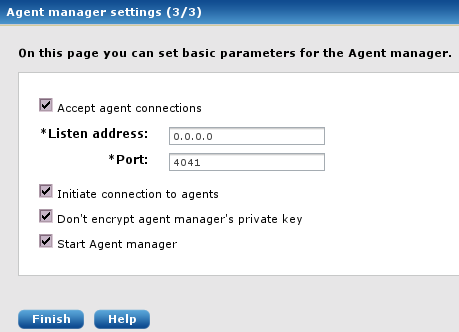
The default values should be sufficient for most users; click Finish.
The initial settings can be changed any time later under the menu items Admin > Settings > Agent Manager and Admin > Settings > Certificates.
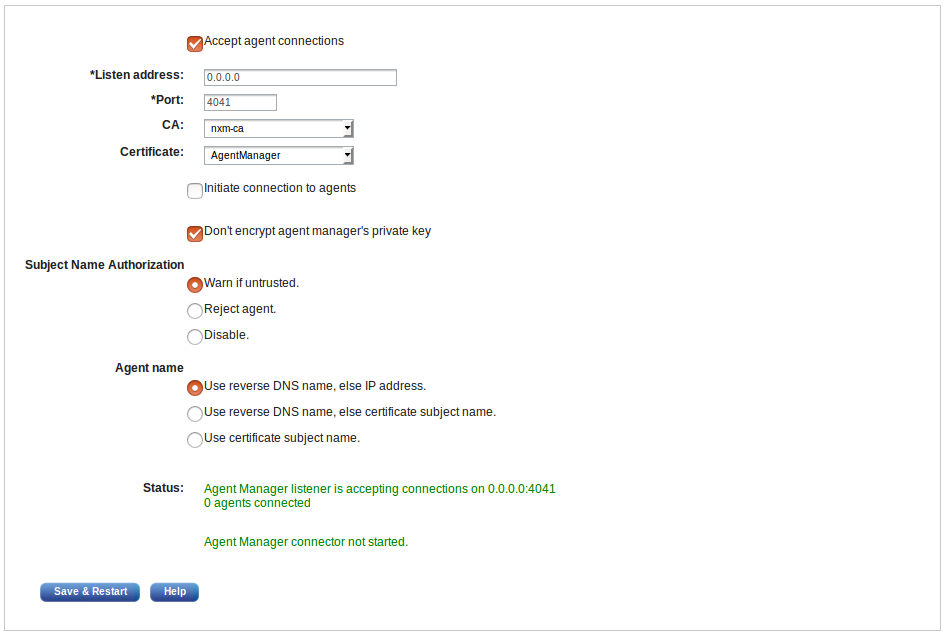
113.10.3. Agent Manager Configuration
Navigate to Admin > Settings > Agent Manager and fill out the following form accordingly.
|
Note
|
If you have already configured the Agent manager with the Wizard as described in the previous section then you will not need to modify anything here. Just make sure your settings are correct. |
Select whether you would like the agents or the agent manager to initiate the connection. This can be useful when special firewall and zone rules apply. Make sure that the agent manager certificate is properly set. Click Save & Restart to apply settings.
113.10.4. Connecting Agents
To ensure that the NXLog agents can only be controlled by the NXLog Manager, NXLog agents are controlled over a secure trusted SSL and each NXLog agent needs its own private key and certificate.
113.10.4.1. Automated Deployment
The requirement of a private key and certificate pair for each NXLog agent would prevent automated installation. Fortunately it is possible to install the NXLog agents with only the CA certificate and an initial configuration containing only the details on how to establish the control connection with the NXLog Manager.
The installation steps for automated agent deployment consist of the following:
-
Install the NXLog package.
-
Copy the initial configuration file.
-
Copy the CA certificate file.
-
Start the NXLog service and verify that it is connected.
These steps are discussed below.
To export the CA certificate, navigate to Admin > Certificates and select the CA with the checkbox as shown in the screenshot below.

Click Export. The CA certificate should be exported using the
'Certificate in PEM format' option. Save the file as agent-ca.pem.
The default installation of NXLog will create a file that is to be
updated by NXLog Manager. On Windows systems this is
C:\Program Files (x86)\nxlog\conf\log4ensics.conf, on GNU/Linux
systems this configuration file is
/opt/nxlog/var/lib/nxlog/log4ensics.conf. When doing an automated
deployment, this file should be replaced with the following default
configuration.
  1
2
3
4
5
6
7
8
9
10
11
12
13
14
15
16
17
18
19
20
21
22
23
24
25
26
27
28
29
30

  # Please set the following values to suit your environment and make
# sure agent-ca.pem is copied to %CERTDIR% with the proper ownership

define NXLOG_MANAGER_ADDRESS X.X.X.X
define NXLOG_MANAGER_PORT 4041

LogLevel    INFO
LogFile     %MYLOGFILE%

<Extension agent_managment>
    Module          xm_soapadmin
    Connect         %NXLOG_MANAGER_ADDRESS%
    Port            %NXLOG_MANAGER_PORT%
    SocketType      SSL
    CAFile          %CERTDIR%/agent-ca.pem
#   CertFile        %CERTDIR%/agent-cert.pem
#   CertKeyFile     %CERTDIR%/agent-key.pem
    AllowUntrusted  TRUE
    RequireCert     FALSE
    <ACL conf>
        Directory   %CONFDIR%
        AllowRead   TRUE
        AllowWrite  TRUE
    </ACL>
    <ACL cert>
        Directory   %CERTDIR%
        AllowRead   TRUE
        AllowWrite  TRUE
    </ACL>
</Extension>
Please make sure to replace X.X.X.X with the proper IP address of the NXLog Manager instance that the NXLog agent needs to be connected to.
The CA certificate file agent-ca.pem must be also copied to the proper
location as referenced in the above configuration which is normally
under C:\Program Files (x86)\nxlog\cert\ on Windows systems and under
/opt/nxlog/var/lib/nxlog/cert/ on GNU/Linux systems.
|
Note
|
When the configuration and certificate files are updated remotely, NXLog must have permissions to overwrite these files when it is running as a regular (i.e. nxlog) user. Please make sure that the ownership is correct: |
# chown -R nxlog:nxlog /opt/nxlog/var/lib/nxlogNow start the NXLog service. The nxlog.log file should contain the
following if the NXLog agent has successfully connected.
2014-10-24 17:24:46 WARNING no functional input modules!
2014-10-24 17:24:46 WARNING no routes defined!
2014-10-24 17:24:46 INFO nxlog-2.8.1281 started
2014-10-24 17:24:46 INFO connecting to agent manager at X.X.X.X:4041
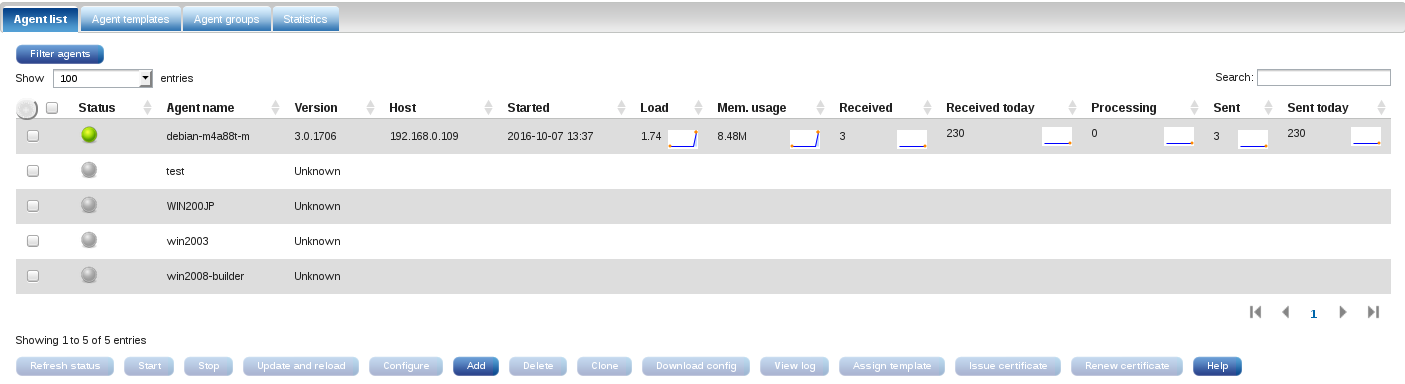
2014-10-24 17:24:46 INFO successfully connected to agent manager at X.X.X.X:4041 in SSL modeClick the AGENTS menu to see the list of agents. You should see the newly connected agent with an UNTRUSTED (yellow) status. If you don’t see the agent there, check the logs for error diagnostics.

The name of the untrusted agent should be the reverse DNS of its IP address.
In order to establish a mutually trusted connection between the NXLog agent and NXLog Manager, a certificate and private key pair needs to be issued and transferred to the agent. Select the untrusted agent in the list and click Issue certificate. When Update connected agents is enabled, the newly issued certificate and the configuration will be pushed to the agent. The agent will need to reload the configuration in order to reconnect with the certificate, select the agent and click Reload.
After the agent has successfully reconnected and the agent list is refreshed the agent status should be 'online' showing a green sphere.

At this stage the NXLog agent should be operational and can now be managed and configured from the NXLog Manager interface.
113.10.4.2. Manual Deployment
Manual deployment requires adding an agent using 'Add' on the interface. After the agent is configured and has its certificate issued, select its checkbox in the agent list and click Download config.
On GNU/Linux systems, extract the agents-config.zip and put the files
under /opt/nxlog/var/lib/nxlog. Make sure the files have the proper
ownership:
# chown -R nxlog:nxlog /opt/nxlog/var/lib/nxlog
On Windows systems, place the certificates in C:\Program Files
(x86)\nxlog\cert. After restarting the NXLog service you should now see
your agent as Online under AGENTS.
113.10.5. Configuring Agents
Once the agent is connected and is shown as Online, it can be remotely configured from the NXLog Manager web interface.
-
To configure the log collection, click on your agent in the agent list and then select the Configure tab.
-
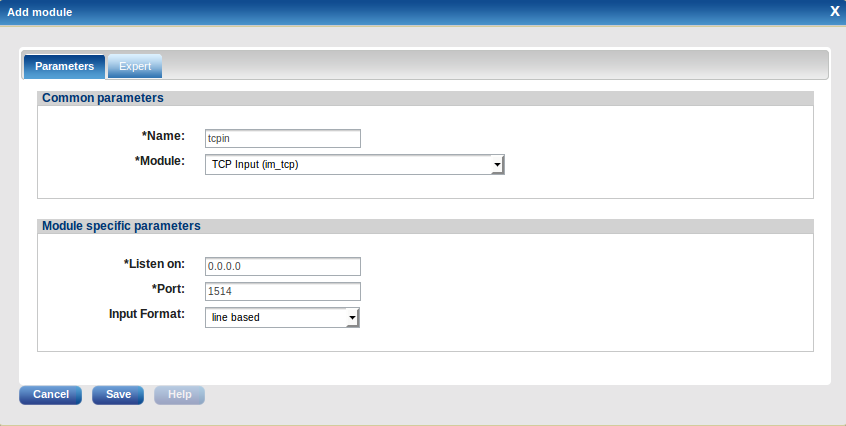
Click 'Routes' and add a route. Add a TCP input module for testing purposes:
Name: tcptest
Module: TCP Input (im_tcp)
Listen On: 0.0.0.0
Port: 1514
Input Format: line based
-
Add an output module. For test purposes we will use a null output that discards the data.
Name: out
Module: Null Output (om_null)
-
Now click Update config on the Info tab, then click Reload.
After the agent is restarted the newly configured modules are visible on the Modules tab.
-
Test the data collection:
telnet x.x.x.x 1514
type something
-
On the Modules tab check all modules and click Refresh status. The count under the Received column is 1 (or more).
The system is now be ready to be further configured as per your requirements.
113.10.6. Configuring Logger Settings
By default, NXLog Manager keeps log files in the /opt/nxlog-manager/log
directory. Log priorities, levels and log rotation can be configured
as per your requirements in the /opt/nxlog-manager/conf/log4j.xml file.
The default configuration will create two separate files nxlog-manager.log
and nxlog-manager.err where only information level messages will be logged
on the first file and error level messages will be logged on the second file.
Log rotation is set by default to rotate both files at the beginning of each
month. The frequency of log rotation can be controlled by the DatePattern
parameter, as shown below.
<appender name="internalAppender" class="org.apache.log4j.DailyRollingFileAppender">
  <param name="File" value="${logs.root}.log"/>
  <param name="Threshold" value="INFO"/>
  <param name="DatePattern" value="'.'yyyy-MM"/>
  <layout class="co.nxlog.manager.common.logging.ContextPatternLayout">
    <param name="ConversionPattern" value="%d %p $host $user $component [%c] - %m %n"/>
  </layout>
</appender>
The following table summarizes different DatePattern options.
| DatePattern | Rollover schedule |
|---|---|
'.'yyyy-MM |
Rollover at the beginning of each month |
'.'yyyy-ww |
Rollover at the first day of each week. The first day of the week depends on the locale. |
'.'yyyy-MM-dd |
Rollover at midnight each day. |
'.'yyyy-MM-dd-a |
Rollover at midnight and midday of each day. |
'.'yyyy-MM-dd-HH |
Rollover at the top of every hour. |
'.'yyyy-MM-dd-HH-mm |
Rollover at the beginning of every minute. |
|
Note
|
The /opt/nxlog-manager/conf/log4j.xml defines three different files,
the two mentioned above as well as a debug file that needs to be enabled
separately. Log rotation can be controlled individually for each log file
by altering the DatePattern parameter at each of the three appender sections.
|
To enable the debug logging:
-
Change the priority level from
INFOtoDEBUG, -
Change
WARNlevel toDEBUGin the loggers you require, -
Remove the comment from the
debugAppenderreference, as shown below.
<root>
  <priority value="DEBUG"/>
  <appender-ref ref="internalAppender"/>
  <appender-ref ref="errorAppender"/>
  <appender-ref ref="debugAppender"/>
</root>
113.11. Enabling HTTPS for NXLog Manager
Depending on the version of NXLog Manager installed, follow the instructions below.
113.11.1. NXLog Manager Version 4.x
To enable HTTPS for secure connections you need to uncomment the last
section in <NXLogManager_HOME>/conf/jetty-config.xml which looks as
follows:
<!--
    <New id="sslContextFactory" class="com.nxsec.log4ensics.web.common.server.util.ssl.SslContextFactory">
        <Set name="ServerCertificate"><Property name="jetty.home" default=".." />/conf/jetty8-cert.pem</Set>
        <Set name="ServerKey"><Property name="jetty.home" default=".." />/conf/jetty8-key.pem</Set>
        <Set name="ServerKeyPassword"></Set>
    </New>

    <Call name="addConnector">
        <Arg>
            <New class="${sslConnector}">
                <Arg><Ref id="sslContextFactory" /></Arg>
                <Set name="Port">9443</Set>
                <Set name="maxIdleTime">30000</Set>
                <Set name="Acceptors">2</Set>
                <Set name="AcceptQueueSize">100</Set>
            </New>
        </Arg>
    </Call>
-->
To disable plain HTTP you should comment out the following connector
section in jetty-config.xml:
<!--
    <Call name="addConnector">
        <Arg>
            <New class="org.eclipse.jetty.server.nio.SelectChannelConnector">
                <Set name="host"><Property name="jetty.host" /></Set>
                <Set name="port"><Property name="jetty.port" default="9090"/></Set>
                <Set name="maxIdleTime">300000</Set>
                <Set name="Acceptors">2</Set>
                <Set name="statsOn">false</Set>
                <Set name="confidentialPort">9443</Set>
                <Set name="lowResourcesConnections">20000</Set>
                <Set name="lowResourcesMaxIdleTime">5000</Set>
            </New>
        </Arg>
    </Call>
-->
113.11.2. NXLog Manager Version 5.x
To enable HTTPS for secure connections you need to uncomment three
sections in <NXLogManager_HOME>/conf/jetty-config.xml which look as
follows:
    <New id="sslContextFactory" class="com.nxsec.log4ensics.web.common.server.util.ssl.SslContextFactory">
        <Set name="ServerCertificate"><Property name="jetty.home" default=".." />/conf/jetty9-cert.pem</Set>
        <Set name="ServerKey"><Property name="jetty.home" default=".." />/conf/jetty9-key.pem</Set>
        <Set name="ServerKeyPassword"></Set>
        <Set name="EndpointIdentificationAlgorithm"></Set>
        <Set name="NeedClientAuth"><Property name="jetty.ssl.needClientAuth" default="false"/></Set>
        <Set name="WantClientAuth"><Property name="jetty.ssl.wantClientAuth" default="false"/></Set>
        <Set name="ExcludeCipherSuites">
            <Array type="String">
                <Item>SSL_RSA_WITH_DES_CBC_SHA</Item>
                <Item>SSL_DHE_RSA_WITH_DES_CBC_SHA</Item>
                <Item>SSL_DHE_DSS_WITH_DES_CBC_SHA</Item>
                <Item>SSL_RSA_EXPORT_WITH_RC4_40_MD5</Item>
                <Item>SSL_RSA_EXPORT_WITH_DES40_CBC_SHA</Item>
                <Item>SSL_DHE_RSA_EXPORT_WITH_DES40_CBC_SHA</Item>
                <Item>SSL_DHE_DSS_EXPORT_WITH_DES40_CBC_SHA</Item>
                <Item>SSL_DHE_RSA_WITH_3DES_EDE_CBC_SHA</Item>
                <Item>SSL_DHE_DSS_WITH_3DES_EDE_CBC_SHA</Item>
                <Item>TLS_DHE_RSA_WITH_AES_256_CBC_SHA256</Item>
                <Item>TLS_DHE_DSS_WITH_AES_256_CBC_SHA256</Item>
                <Item>TLS_DHE_RSA_WITH_AES_256_CBC_SHA</Item>
                <Item>TLS_DHE_DSS_WITH_AES_256_CBC_SHA</Item>
                <Item>TLS_DHE_RSA_WITH_AES_128_CBC_SHA256</Item>
                <Item>TLS_DHE_DSS_WITH_AES_128_CBC_SHA256</Item>
                <Item>TLS_DHE_RSA_WITH_AES_128_CBC_SHA</Item>
                <Item>TLS_DHE_DSS_WITH_AES_128_CBC_SHA</Item>
            </Array>
        </Set>
</New><New id="sslHttpConfig" class="org.eclipse.jetty.server.HttpConfiguration">
<Arg><Ref refid="httpConfig"/></Arg>
<Call name="addCustomizer">
<Arg><New class="org.eclipse.jetty.server.SecureRequestCustomizer"/></Arg>
</Call>
</New> <Call name="addConnector">
<Arg>
<New id="sslConnector" class="org.eclipse.jetty.server.ServerConnector">
<Arg name="server"><Ref refid="Server" /></Arg>
<Arg name="factories">
<Array type="org.eclipse.jetty.server.ConnectionFactory">
<!-- uncomment to support proxy protocol
<Item>
<New class="org.eclipse.jetty.server.ProxyConnectionFactory"/>
</Item>-->
<Item>
<New class="org.eclipse.jetty.server.SslConnectionFactory">
<Arg name="next">http/1.1</Arg>
<Arg name="sslContextFactory"><Ref refid="sslContextFactory"/></Arg>
</New>
</Item>
<Item>
<New class="org.eclipse.jetty.server.HttpConnectionFactory">
<Arg name="config"><Ref refid="sslHttpConfig" /></Arg>
</New>
</Item>
</Array>
</Arg>
<Set name="host"><Property name="jetty.host" /></Set>
<Set name="port"><Property name="jetty.https.port" default="9443" /></Set>
<Set name="idleTimeout"><Property name="ssl.timeout" default="30000"/></Set>
</New>
</Arg>
</Call>
<Call class="java.lang.System" name="setProperty">
<Arg>org.apache.jasper.compiler.disablejsr199</Arg>
<Arg>true</Arg>
</Call>
<!-- Fix for java.lang.IllegalStateException: Form too large 207624>200000 -->
<Call name="setAttribute">
<Arg>org.eclipse.jetty.server.Request.maxFormContentSize</Arg>
<Arg><Property name="jetty.maxFormContentSize" default="1000000"/></Arg>
</Call>113.11.3. NXLog Manager Version 6.X.XXXX
To enable HTTPS for secure connections you must enable jetty’s ssl and
https modules. To do this, uncomment these lines in
<NXLogManager_HOME>/start.ini which look as follows:
#--module=ssl#--module=https113.11.4. NXLog Manager SSL keys for versions 4.x and 5.x
These versions of NXLog Manager are bundled with default key pair in
pem format to be used for the secure connection under
<NXLogManager_HOME>/conf/, namely jetty8-cert.pem and
jetty8-key.pem. These can be customized in jetty-config.xml
by editing ServerCertificate and ServerKey properties of
sslContextFactory. Provide the ServerKeyPassword if the private key
is password protected.
Now NXLog Manager can be restarted with HTTPS enabled with the default
port 9443. The port can also be also customized in jetty-config.xml.
113.11.5. NXLog Manager SSL keys for versions 6.X.XXXX
Version 6 of NXLog Manager is bundled with default keystore in PKCS12
format which is password protected and contains the keys to be used
for the secure connection under <NXLogManager_HOME>/etc/, namely
keystore.p12. This can be customized in start.ini by editing
jetty.sslContext.keyStorePath and jetty.sslContext.trustStorePath
properties of the ssl module. You can change the keystore password
under jetty.sslContext.keyStorePassword if the keystore is password
protected. Jetty9 supports hashed passwords in the configuration file,
which can be generated by using Jetty’s password utility. For example,
enter the following command to generate a secured version of the password
newpass for user myuser:
> java -cp <NXLogManager_HOME>/jetty-util-xxx.jar org.eclipse.jetty.util.security.Password myuser newpasswhere -xxx signifies the version of Jetty installed in NXLog-Manager. The following output will be generated:
blah
OBF:20771x1b206z
MD5:639bae9ac6b3e1a84cebb7b403297b79
CRYPT:me/ks90E221EY
The first line is plain text password. Copy and paste the secured
version of your choice with the prefix in start.ini under the property
jetty.sslContext.keyStorePassword. Creating/managing keystore is out
of scope of this document.
Now NXLog Manager can be restarted with HTTPS enabled with the default
port 9443. The port can also be also customized in start.ini by editing
jetty.ssl.port.
113.12. Increasing the Open File Limit for NXLog Manager Using systemd
This section explains how to adjust the limit for the number of files that the
nxlog-manager service can open in Linux. To achieve this, a configuration
file needs to be created under the systemd directory, which will
permanently hold the required open file limit setting. This way, package
upgrades in the Linux system will never overwrite this configuration.
Procedure
-
Create the directory that will hold the changes for the
nxlog-managerservice.# sudo mkdir -p /etc/systemd/system/nxlog-manager.service.d/
-
Create the /etc/systemd/system/nxlog-manager.service.d/limits.conf file with the following content:
[Service]
LimitNOFILE=10000
In this configuration,
10000represents to the number of files that NXLog Manager is allowed to open. Change this number to suit the requirements of your environment. -
For the configuration to take effect, reload the
systemd deamon.# sudo systemctl daemon-reload
-
To tell NXLog Manager about the changes, the
nxlog-managerservice needs to be restarted.-
On Debian Wheezy or RHEL6/CentOS6
# service nxlog-manager restart
-
On Debian Stretch or RHEL7/CentOS7
# systemctl restart nxlog-manager
-
113.13. Upgrading NXLog Manager
Upgrading from earlier versions of NXLog Manager will require changes to the database structure. To complete the upgrade it is required to stop the NXLog Manager service before proceeding.
# service nxlog-manager stop|
Note
|
It is always advisable and good practice to create a backup
before upgrading. This enables the process to be rolled back if something
goes wrong. Use mysqldump or phpMyAdmin to backup MySQL/MariaDB.
|
113.13.1. Upgrade to version 4.0.6223 or later
Follow this procedure if you are running a version of NXLog Manager earlier than 4.0.6223, and you are planning to upgrade to version 4.0.6223 or later, but not to version 5x.
After stopping the NXLog Manager service, upgrade NXLog Manager
but do not start the service. Navigate to
/opt/nxlog-manager/db_init/upgrade/ and execute the
command:
# mysql -u root nxlog-manager4 < upgrade_to_6223.sqlThe upgraded version of NXLog Manager service can now be started.
113.13.2. Upgrade from Version 4.x to Version 5.x
Follow this procedure, to upgrade from version 4 of NXLog Manager to version 5.x.
After stopping the NXLog Manager service, upgrade NXLog Manager
but do not start the service. The upgraded NXLog Manager
requires first a database initialization.
Do not start the NXLog Manager service as part of the initialization.
After initializing the database, navigate to
/opt/nxlog-manager/db_init/upgrade/ and execute the
command:
# mysql -u root -p < upgrade_v4_to_v5.sqlThe command will copy all the relevant information from the earlier version of NXLog Manager database to the new database without altering the old database. The upgraded version of NXLog Manager service can now be started.
113.13.3. Upgrade Version 5.x to Later 5.x version
Follow this procedure, to upgrade version 5.x installation of NXLog Manager.
After stopping the NXLog Manager service, upgrade the NXLog Manager packages through dpkg/apt or rpm/yum and then start the service.
# service nxlog-manager start# systemctl start nxlog-manager113.14. Host Setup Common Issues
This section describes some common issues that may prevent NXLog Manager from working correctly. These are not related to the installation or configuration of the Manager itself.
113.14.1. Hostname Resolution Issues
For NXLog Manager to work correctly, the hostname of the host must
resolve to the correct IP address. The following error will be present
in /opt/nxlog-manager/log/nxlog-manager.err, if that is not the case.
2016-11-21 16:14:31,015 ERROR localhost unknown nxlog-manager [net.sf.ehcache.Cache] - Unable to set localhost. This prevents creation of a GUID. Cause was:
 java.net.UnknownHostException: nxlogmgr.domain.local
To set the hostname to myname you can either issue the command:
# hostname mynameOr edit /etc/hostname directly. In both cases the hostname will
change on the next reboot. For the hostname to resolve correctly,
there should be a matching line in /etc/hosts that usually aliases
the host name and the FQDN.
127.0.1.1 myname.example.com myname
113.14.2. DNS Lookup Issues
Make sure that your DNS is setup correctly and it is functioning properly. DNS timeouts and errors can cause various issues, mainly because TLS certificate verification is using DNS lookups.
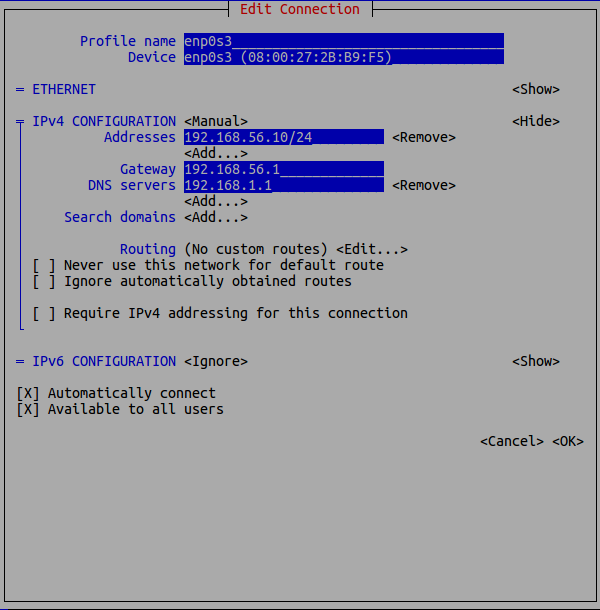
If your Linux distribution or setup uses Network Manager, DNS can be configured by issuing the following command.
# nmtuiSelect the 'Edit a connection' option and then 'Edit connection'. You will presented with a dialog similar to the following, where DNS servers can be added, altered or removed.
If your setup does not use the Network Manager, you must edit the
/etc/resolv.conf file manually. Usually up to three nameservers
can be set up using the nameserver keyword, followed by the IP
address of the nameserver.
To test whether your configuration functions correctly, use the host or dig programs to perform both a DNS lookup and a reverse DNS lookup (by querying with an IP address). Make sure that participating hosts on your NXLog collection system are resolved correctly.