118. Agents
NXLog agents are used to collect and store event log data. This chapter discusses the GUI configuration and management frontend provided by NXLog Manager. For more information about the NXLog agent, please refer to the NXLog Enterprise Edition Reference Manual.
NXLog agent instances can be managed, monitored, and configured remotely over a secure channel. The management component in NXLog Manager is called the agent manager. There are two operation modes:
-
The NXLog agent initiates the connection and connects to the agent manager.
-
The agent manager initiates the connection and connects to the NXLog agent.
Mutual X.509 certificate-based authentication is used over a trusted, secure TLS/SSL channel in order to guarantee that only an authorized NXLog agent can connect to the agent manager. The agent manager queries the status information of each NXLog agent every 60 seconds.
118.1. Managing Agents
To list the available NXLog agents, click AGENTS. A list similar to the following appears:
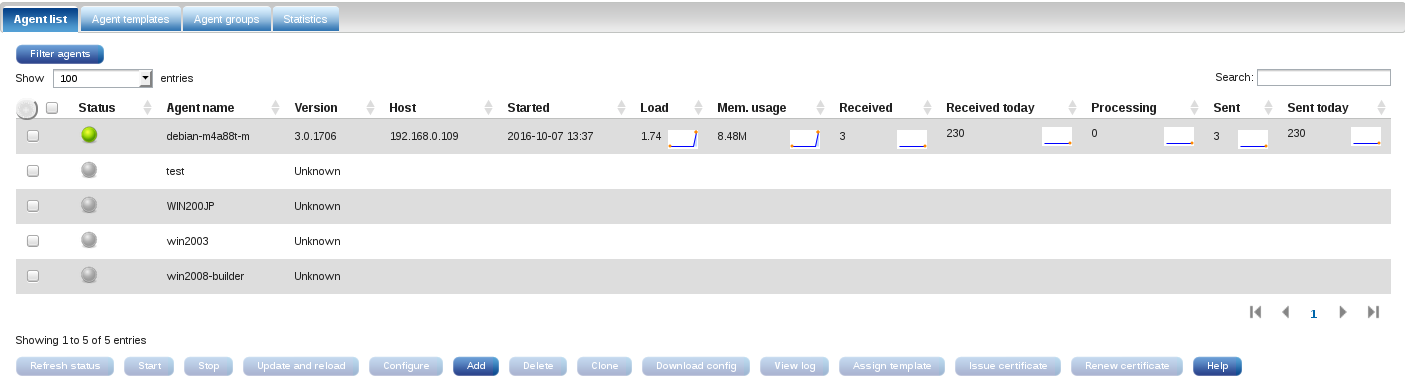
This list displays the following information:
- Status
-
A coloured sphere shows the agent’s status:
- Green - Online
-
The agent is connected and its latest status response is successful. The agent is functioning normally.
- Grey - Offline
-
The agent is not connected to the agent manager. Check the NXLog agent’s LogFile for error diagnostics.
- Red - Error
-
One or more modules which the agent is configured to use are not running or not configured correctly. For network output modules, there is likely a connection issue and the module is unable to send. Check the NXLog agent’s LogFile for error diagnostics.
- Yellow - Unmanaged
-
The agent is configured to be Unmanaged, and it is not possible to administer it remotely.
- Yellow - Untrusted
-
The agent is connected to the manager without its own certificate. An agent must be issued a valid, unique certificate if it was installed without one.
- Yellow - Forged
-
The agent certificate has a CN (common name) that does not match the reverse DNS of this agent’s IP address. Certificates must be issued to each agent—they must not be copied or configured from another agent.
NoteOnce the agent configuration is updated centrally (by the application), or locally (on the agent side), changes must be deployed via the Update config command in order to apply the central configuration. If the configuration has been changed locally, a confirmation will be requested. - Agent name
-
Since the agent name is taken from the certificate subject name, the same name must be used for the agent name as is used in the certificate subject. Click the agent name to load the Agent information page.
- Template
-
The identifier of the template assigned to this agent. Agents inherit all template configuration settings. For more information about templates, see the chapter on Templates.
NoteThis column is not displayed by default. To enable or disable column visibility, click the round, grey Configuration button on the top left of the table, then check (or uncheck) the box by the name of the column. - Tags
-
The tags assigned to this agent. Tags may also be assigned to a template. For more information about configuring tags for templates, see Tags section.
NoteThis column is not displayed by default. To enable or disable column visibility, click the round, grey Configuration button on the top left of the table, then check (or uncheck) the box by the name of the column. - Version
-
The NXLog agent version number.
- Host
-
The IP address of the remote host from which the NXLog agent is connected. Not available when the agent is Offline or Unmanaged.
- Started
-
Shows the time the NXLog agent last started. Not available when the agent is Offline or Unmanaged. This value is set when the NXLog service is started or restarted, but it is not set when using the Reload button.
- Load
-
The system load as reported by the NXLog agent’s host operating system. If this is not implemented on a platform (e.g. Microsoft Windows) Unknown will be displayed. A small graph displays the last 10 average values. This information is not available when the agent is Offline or Unmanaged.
NoteThis value represents the system load of the host operating system, not the NXLog agent. Due to other resource intensive processes, this can be high even if the NXLog agent is idle. - Mem. usage
-
The amount of memory used by the NXLog agent. On some platforms, Unknown is shown if the information is not available. A small graph displays the last 10 average values. This information is not available when the agent is Offline or Unmanaged.
- Received
-
The sum of log messages received by all input modules since the agent has been started. A small graph displays the last 10 average values. This information is not available when the agent is Offline or Unmanaged.
- Received today
-
The sum of log messages received by all input modules in the last 24 hours. A small graph displays the last 10 average values. This information is not available when the agent is Offline or Unmanaged.
- Processing
-
Each NXLog agent module has a separate queue. This number shows the sum of messages in all modules' queues. A small graph displays the last 10 average values. This information is not available when the agent is Offline or Unmanaged.
- Sent
-
The sum of log messages written or sent by all output modules since the agent has been started. A small graph displays the last 10 average values. This information is not available when the agent is Offline or Unmanaged.
NoteIf there are two output modules writing or sending logs from a single input, the number under Sent will be double of the value under Received. - Sent today
-
The sum of log messages written or sent by all output modules in the last 24 hours. A small graph displays the last 10 average values. This information is not available when the agent is Offline or Unmanaged.
NoteIf there are two output modules writing or sending logs from a single input, the number under Sent will be double of the value under Received.
The information shown in the agent list is refreshed every 60 seconds or when Refresh status is clicked.
On the top left, the Filter agents button and the Show n entries drop-down menu are used to reduce the number of items displayed.
Click Filter agents to display the following dialog:
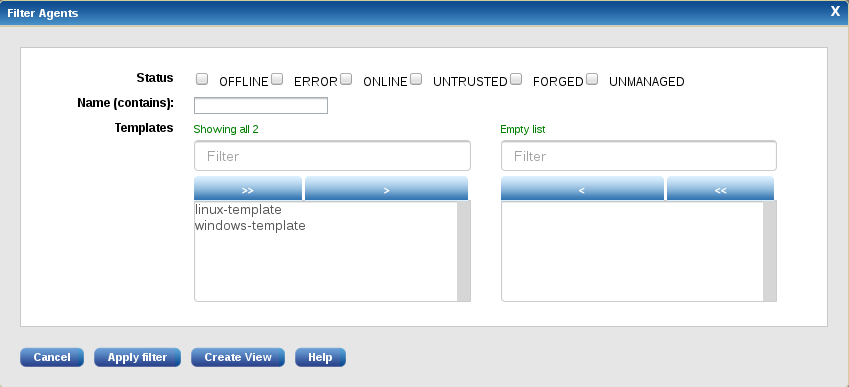
The agents list can be filtered by 3 criteria:
-
Agent Status
-
Agent Name
-
Template(s) assigned
Click Apply filter to refresh the agent list with only agents which match the filtering criteria. For example, selecting ONLINE status will show the following:

When a filter is applied, click Clear filter to discard the applied filter and show all agents.
On the Filter Agents dialog, there is an option to save the current filter in the configuration database as an Agents View. Click Create View to enter the view name:
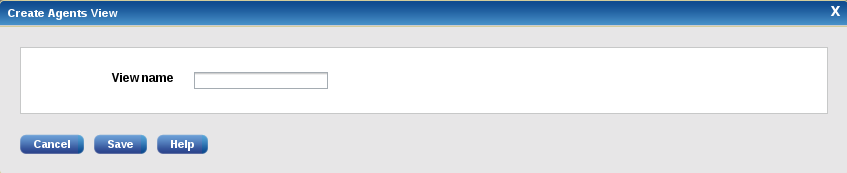
The view name must be unique, and not contain any special characters or spaces. Saved views appear as tabs next to the Agent templates tab. A newly created view is applied to the current list immediately:

At the bottom of the agent list is a row of actions used to manage agents.
|
Note
|
The NXLog process cannot be stopped or started from the NXLog Manager management interface. |
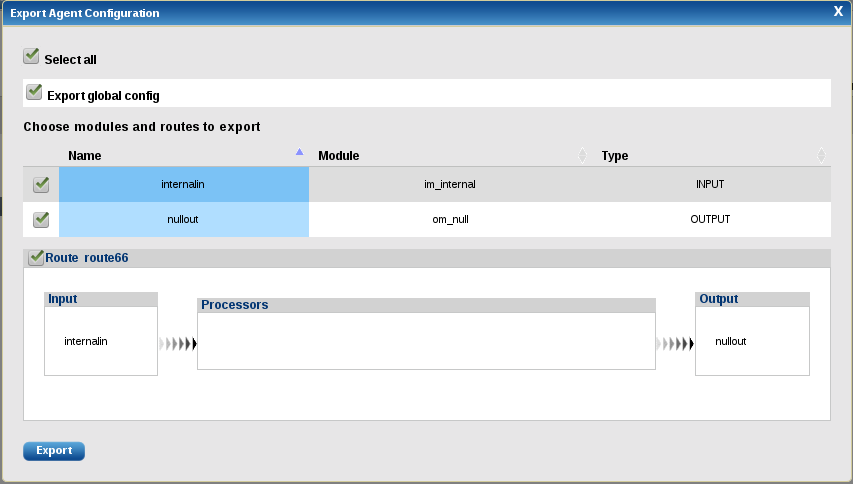
- Export
-
Export agent configuration in XML text format. When activated on the selected agent the export action dialog appears. In this dialog, the manager allows separate parts to be exported. When the export is finished, the browser downloads it.
- Import
-
Import an agent configuration, typically one previously exported.
NoteThere is the option to override and define new global configuration such as the new manager address. When triggered, the browser redirects to import options (if global config has been overridden, this section is skipped):

Similar to the "Clone" agent function, choose the XML file to import the new agent(s) configuration. When this is done, the manager also allows separate parts of the configuration to be imported:
118.1.1. Agent Information
The following agent information page is loaded when an Online agent is selected by clicking the agent’s name.

The page will show less information if the agent is not connected to the agent manager. The action buttons on this page function similarly to those on the agent list page, discussed above.
If the agent is Online and some of its modules have variables or statistical counters, they will appear on this page in a table.
118.1.1.1. Modules
Click the Modules tab to show detailed information about each module as shown in the following image.
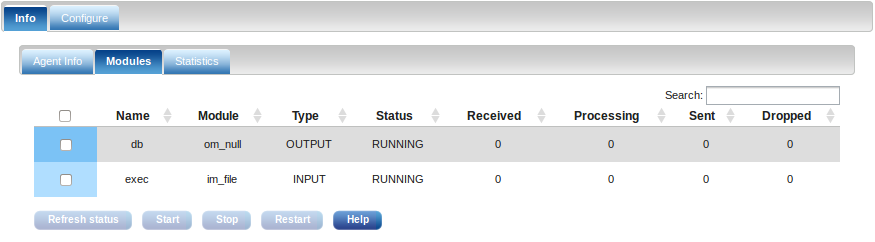
This information is only available when the agent is Online. The table contains the following information.
- Name
-
The name of the module instance.
- Module
-
The type of loadable module which was used to create the module instance.
- Type
-
The type of module:
-
INPUT
-
PROCESSOR
-
OUTPUT
Extension module instances are not shown.
-
- Status
-
The status of the module:
-
STOPPED
-
RUNNING
-
PAUSED
-
UNINITIALIZED
NoteThe module may become PAUSED if it cannot send or forward the output. This is caused by the built-in flow control and is perfectly normal unless you see the module in this status for a longer period and the number of sent messages does not increase. You do not need to start the module when it is PAUSED, it will resume operations automatically.
-
- Received
-
The number of log messages received or read.
- Processing
-
The number of log messages in the module’s queue waiting to be processed.
- Sent
-
The number of log messages written or sent by the module.
- Dropped
-
The module may drop some messages. This number will be shown here. This is calculated using the values reported in Received and Sent.
118.1.1.2. Statistics
Click the Statistics tab to display several fully interactive graphs. There is a graph for each of the following parameters:
-
System load & memory usage.
-
Total event count.
-
Event counts for each module.
Optionally, additional graphs can be added for module variables and statistical counters by clicking the Add chart button.
Select a module and fill in the name of the variable. Regular expressions of the name are also supported.
Select the graph’s interval from the following values displayed in the drop-down menu:
-
Six hours
-
One day
-
One week
-
One year

118.1.2. Agent Configuration
To load the agent configuration form, click the Configure button on the agent list page or the Configure tab at the top of the agent page. The global configuration tab appears.
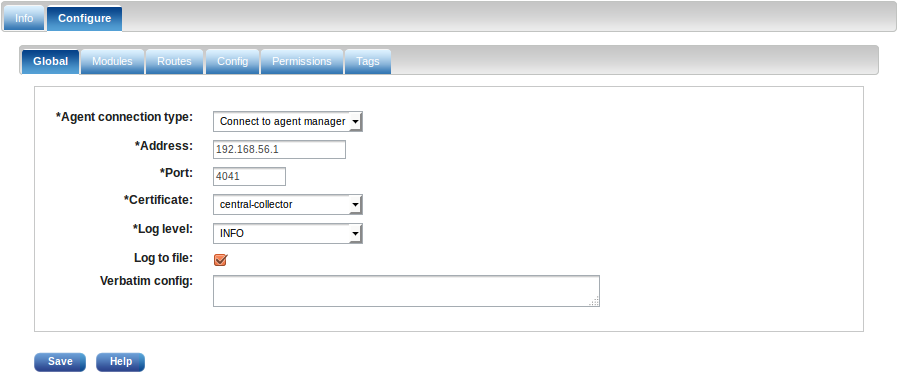
The list of parameters are explained below.
- Agent name
-
Set this to the certificate subject name. It is automatically filled out when the agent is connected and automatically added.
- Connection type
-
- Unmanaged
-
Set the connection type to Unmanaged if you do not want to administer the agent remotely over a secure connection.
- Listen (accept agent manager connection)
-
The NXLog agent will listen on the IP address and port for incoming TLS/SSL connections. You must also configure the agent manager to initiate connection to the agents.
- Connect to agent manager
-
The NXLog agent will initiate the connection to the agent manager.
- Address
-
Either the address to which the agent should connect or the address to which the agent is listening, depending on the Connection type setting.
- Port
-
Either the port number to which the agent should connect or the port to which the agent is listening, depending on the Connection type setting.
- Certificate
-
The certificate to be presented by the NXLog agent during the mutual authentication phase when the connection is established with the agent manager. The agent manager will check whether the agent certificate has been signed with the CA configured on the Agent Manager settings tab.
- Log level
-
The level of detail to use when sending internal messages to the logfile and the im_internal input module.
- Log to file
-
Enable this to use a local
nxlog.logfile where NXLog agent internal events are written. This method is more efficient and error resistant than using the im_internal module, and it also works with the DEBUG log level.
- Verbatim config
-
Verbatim configuration text for this agent. This configuration will be placed in the log4ensics.conf file as is.
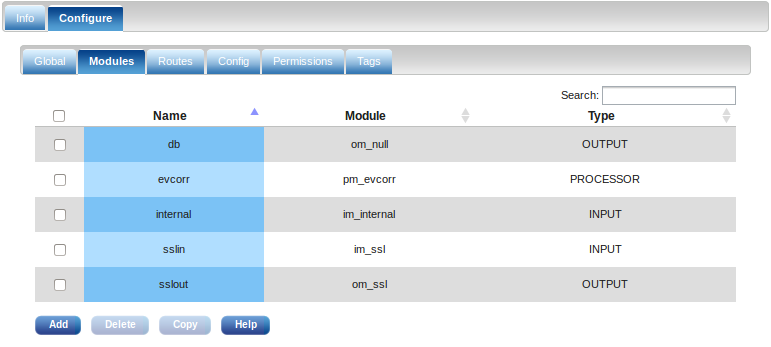
The list of modules can be managed independently regardless of the route they belong to. The following screenshot shows an example list of modules.
- Add
-
Click Add to add a new module. The module configuration dialog will pop up.
- Remove
-
To remove a module, click the checkbox after the module’s name. Modules which are already part of a route cannot be removed.
- Routes
-
Go to the Routes tab to remove or add modules to a route. On the other hand, modules not part of a route can only be removed on this list. Configuration will not be generated for modules which are not part of a route.
- Copy
-
Click Copy to copy this module configuration to other agents. A popup will appear to select them. Click the module’s name to modify its configuration.
To configure the flow of log data in the NXLog agent, click the Routes tab. A freshly created agent does not have any routes. Click Add route to add a route.
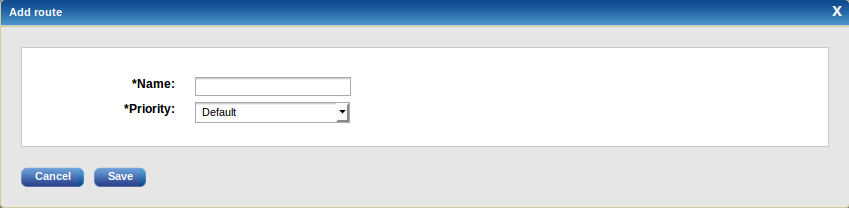
Enter the name and select the priority. Data will be processed in priority order among routes. Lower gets processed first. This is only useful if you have more routes which contain different input sources. Select default if you do not wish to assign a priority value.
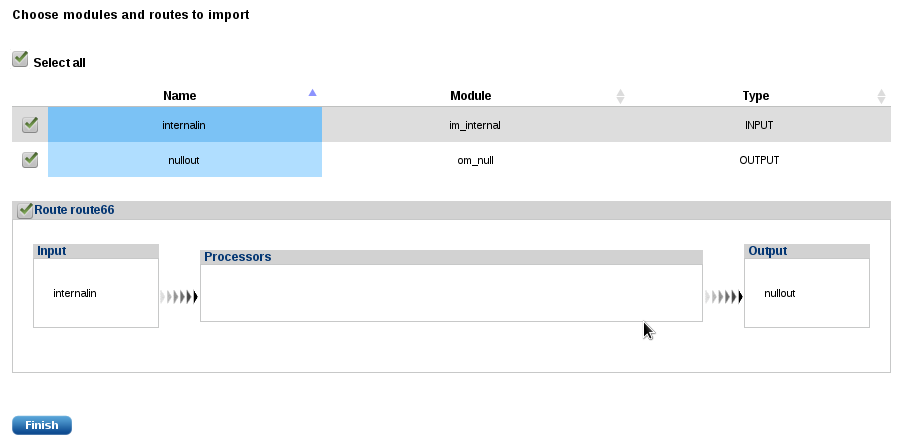
After the route is added, you can now add modules to it. A route requires at least one input and one output module. The following screenshot shows an example of a route with one module for each type.
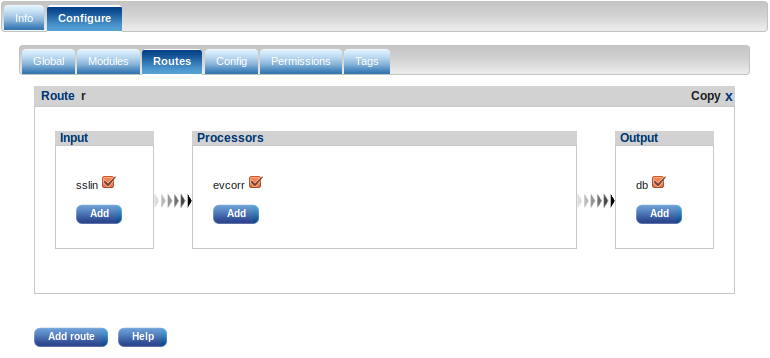
Click the Add button inside the input/processor/output block to add a module instance. The module configuration dialog will pop up. If there is already an existing module instance, you will be able to select that also. It is possible to add more module instances to each block. To remove a module, uncheck the checkbox after its name. The module instance is only removed from the route. To fully delete it, click the Modules tab and remove the module.
As with modules, an entire route can be copied to other agents. Click the Copy link on the top right of a route to select one or more agents to copy to.
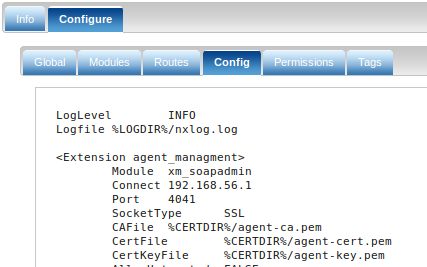
The last tab contains the generated NXLog configuration which will be pushed to the NXLog agent when Update config is clicked, as shown in the following screenshot.
118.1.3. Module Configuration
When a new module instance is created, the following dialog window is shown.
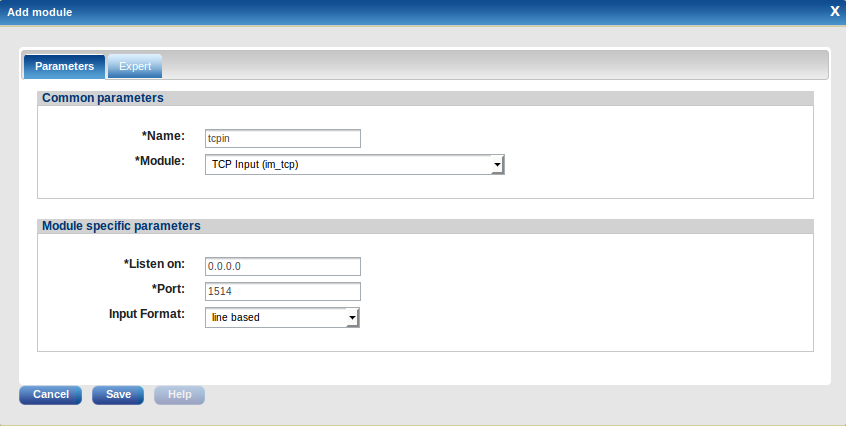
118.1.3.1. Parameters
The module configuration dialog Parameters tab consists of two blocks: Common parameters and Module specific parameters. The Common parameters are as follows:
- Name
-
The name of the module instance.
- Module
-
The loadable module which is used to create the module instance.
118.1.3.2. Expert
Click the Expert tab for advanced configuration.
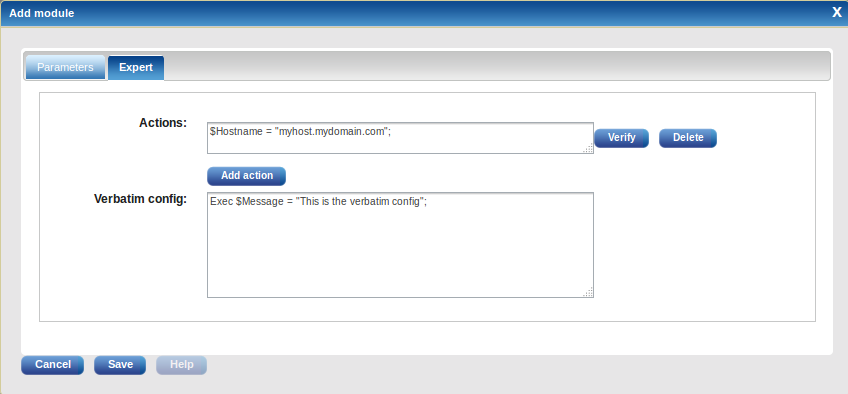
The module configuration dialog Expert tab consists of:
- Actions
-
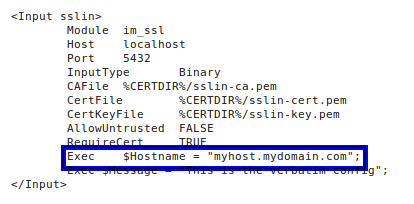
The Actions text area can be used to input statements in NXLog’s configuration language. It is possible to add multiple Action input widgets. Add each action with the Add action button. Click Verify to verify the statement(s). The contents of the Action block are copied into the module’s Exec directive. Newline characters will be replaced with the backslash escape character.
The statement entered in the example screenshot above is highlighted below in the generated NXLog configuration.
- Verbatim config
-
The following is generated into
nxlog.conffrom the above: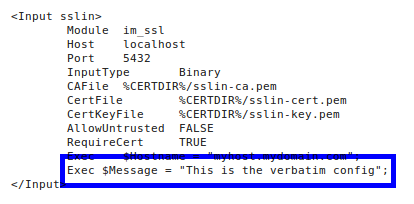
Module specific parameters are not discussed in this user manual. Please consult the NXLog Enterprise Edition Reference Manual for more information about each module and its capabilities.