127. Cisco FireSIGHT eStreamer
The eStreamer add-on can be used with NXLog to collect events from a Cisco FireSIGHT System. The Cisco Event Streamer (eStreamer) API is used for communication between NXLog and the FireSIGHT System. This section describes how to set up FireSIGHT and NXLog and start collecting events.
For more information about eStreamer, see FireSIGHT System eStreamer Integration Guide v5.4 on Cisco.com. To download the full Firepower eStreamer SDK, see eStreamer SDK Version 6.1 on Cisco Community.
127.1. Configuring the Cisco Defense Center
To receive events from the Cisco Defense Center, a client must be added to the eStreamer Event Configuration.
-
Log in to the Management Center and navigate to System → Integration → eStreamer.
NoteDepending on the Cisco system, the eStreamer configuration and client creation page location may differ. In other systems, the same page can be found under System → Local → Registration → eStreamer. -
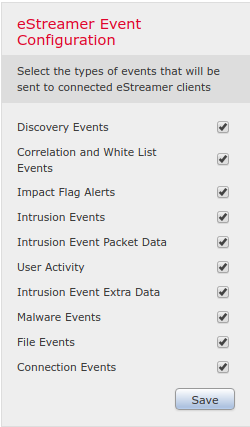
Select the event types that should be sent and then click Save.

-
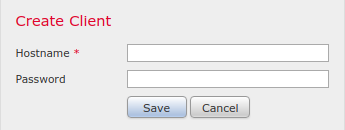
Enter an IP address or a resolvable name in the Hostname field and optionally a password. Click Save.

-
Click on the download arrow to download the certificate for the client. Place the PKCS12 certificate in the same directory as the Perl client.
127.2. Configuring the eStreamer Script
The estreamer.pl client is based on Cisco’s ssl_test.pl reference client
which is included in the FireSIGHT eStreamer SDK.
-
Make sure the following required Perl modules, which are part of the FireSIGHT eStreamer SDK, are present in the same directory: SFStreamer.pm, SFPkcs12.pm, SFRecords.pm, and SFRNABlocks.pm.
-
Edit the script and set the configuration options. The available options include the following.
-
The server address and port
-
The file name and password used for the PKCS12 certificate
-
Enable/disable verbose output
-
The start time for receiving events: using bookmarks (by setting to
bookmark) ensures that no events will be lost or duplicated. -
The output mode: typically this is set to
\&send_nxlog; however there is a\&send_stdout_rawoutput where all data and meta-data is printed to standard output (for debugging purposes).
-
-
In the
$OUTPUT_PLUGINsection of the script, the type of event request can be customised. Refer to the FireSIGHT System eStreamer Integration Guide for more information. -
Finally, the output mode subroutine
\&send_nxlogmight require modification if the presentation of the data needs to be altered or alternative data or metadata need to be included or excluded. The\&send_stdoutsubroutine can be used to show the output sent to NXLog and the\&send_stdout_rawcan be used to show the full contents of the data stream. Remember to set the$conf_opt->{output}variable to the appropriate subroutine.
127.3. Configuring NXLog
The im_perl module is used to execute the Perl script, which in turn connects to the server and receives events. The Perl script directly sets various NXLog internal fields from the event data data collected from eStreamer.
This configuration uses the im_perl module to execute the Perl script. The resulting internal NXLog fields are then converted to JSON format before being written to file with om_file.
  1
2
3
4
5
6
7
8
9
10
11
12
13
14
15
16
17
18

  <Extension _json>
    Module      xm_json
</Extension>

<Input estreamer>
    Module      im_perl
    PerlCode    /opt/nxlog/bin/estreamer.pl
</Input>

<Output file>
    Module      om_file
    File        '/tmp/output.log'
    Exec        to_json();
</Output>

<Route estreamer_to_file>
    Path        estreamer => file
</Route>
The following is a sample output of intrusion detection events in JSON format.
{
  "EventTime": "2018-1-24 11:50:23.939847",
  "AlertPriority": 3,
  "SourceIp": "192.168.99.2",
  "SourcePort": 0,
  "DestinationIp": "192.168.98.2",
  "DestinationPort": 0,
  "EventMessage": "PROTOCOL-ICMP Echo Reply",
  "EventReceivedTime": "2018-01-24 11:50:29",
  "SourceModuleName": "perl",
  "SourceModuleType": "im_perl"
}
{
  "EventTime": "2018-1-24 11:50:34.499867",
  "AlertPriority": 3,
  "SourceIp": "192.168.98.2",
  "SourcePort": 0,
  "DestinationIp": "192.168.99.2",
  "DestinationPort": 0,
  "EventMessage": "PROTOCOL-ICMP Echo Reply",
  "EventReceivedTime": "2018-01-24 11:50:35",
  "SourceModuleName": "perl",
  "SourceModuleType": "im_perl"
}|
Note
|
An ICMP Echo Reply is not typically an intrusion detection event; however, it was a convenient way to simulate one. |